You will not be able to list your products until you have setup your Stripe account to receive payments. Please see our tutorial on “Getting paid with Stripe connect” here.

Handmade items: Items that are made and/or designed by the seller
Kiwiana: items pertaining to New Zealand
Vintage Items: Items that are at least 20 years old
Craft supplies: Tools, ingredients, or materials that can be used in the creation of an item or special occasion
Our Kinwi marketplace is for items;
Items must be handmade by you, designed by you, grown by you, or natural (such as crystals & stones). You are only permitted to resell a new item if it is for Craft or growing supplies. You may only list “used” items in the “Kiwiana & vintage” & “Music, Movies and Books” categories. Vintage items are items over 20 years old. We may ask for verification of age for these items. All items listed in the Music, Movies & Books category must link to New Zealand and/or Kiwi talent. Craft and growing supplies do not need to be handcrafted, but they must be located in New Zealand. All items must be located in New Zealand and cannot be shipped outside of New Zealand.
Please view our Selling policy and Prohibited Items policy for more in depth detail.
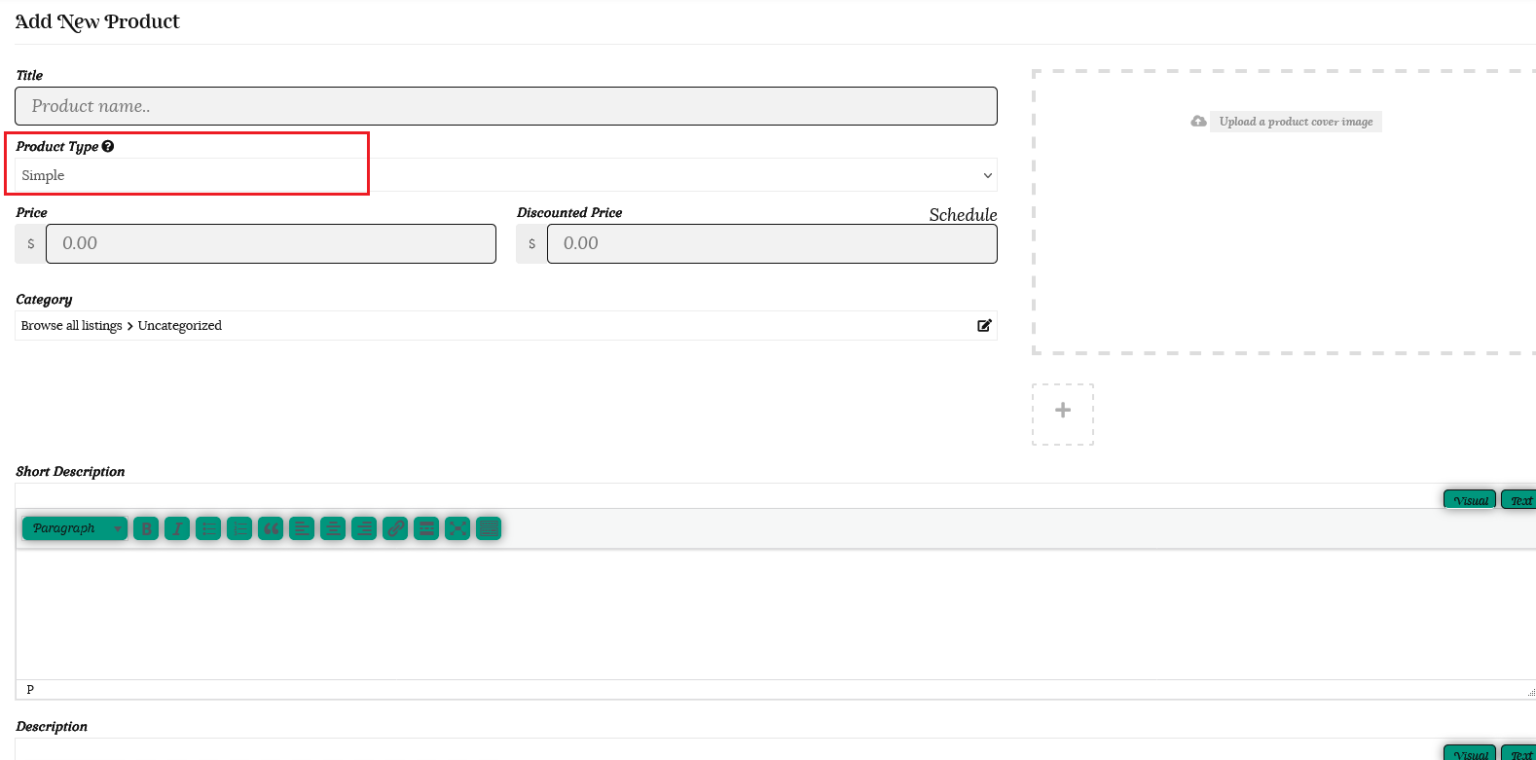
Simple products have no variants, such as colour or size. They are single standalone products.
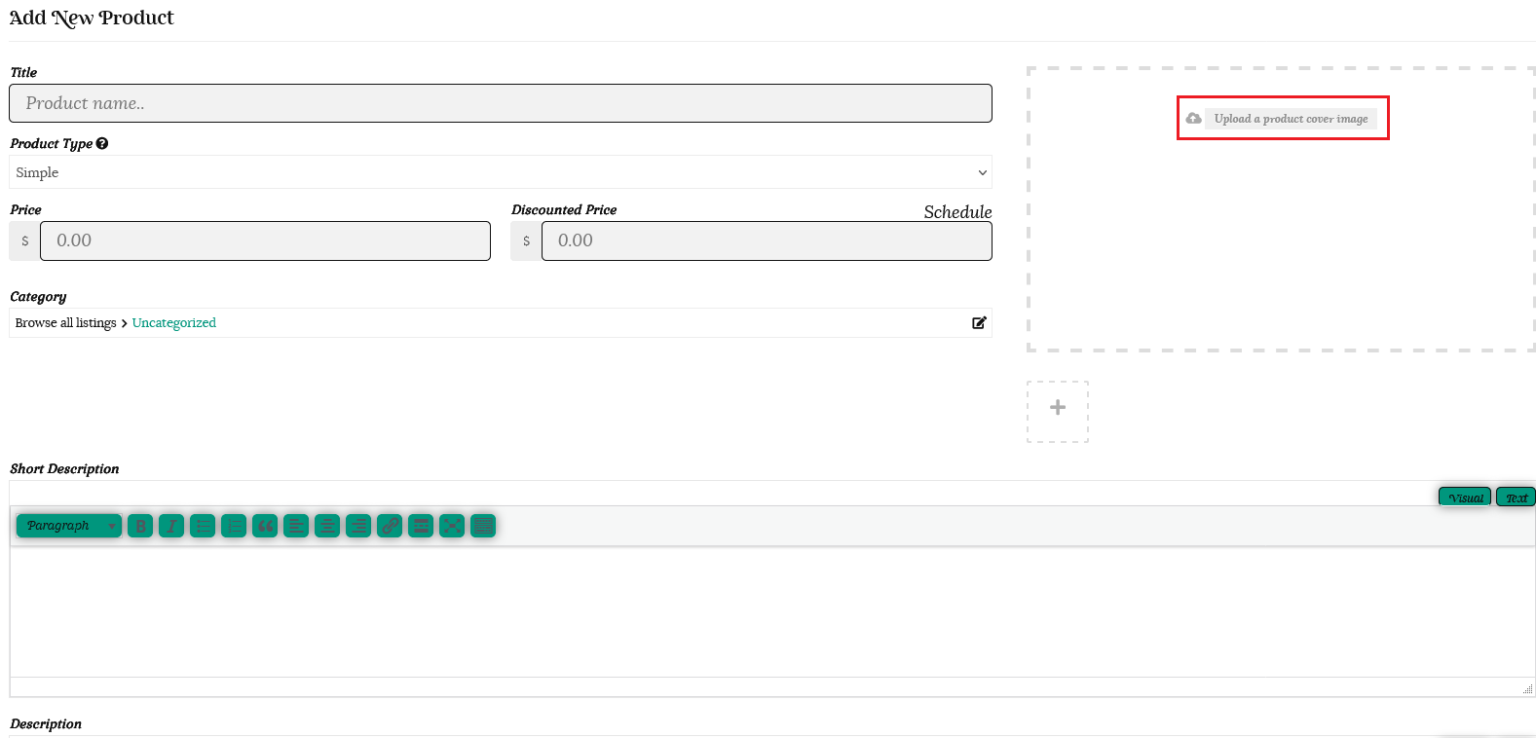
Navigate to the “Products” tab in your vendor dashboard and click the “Add New product” button at the top right.
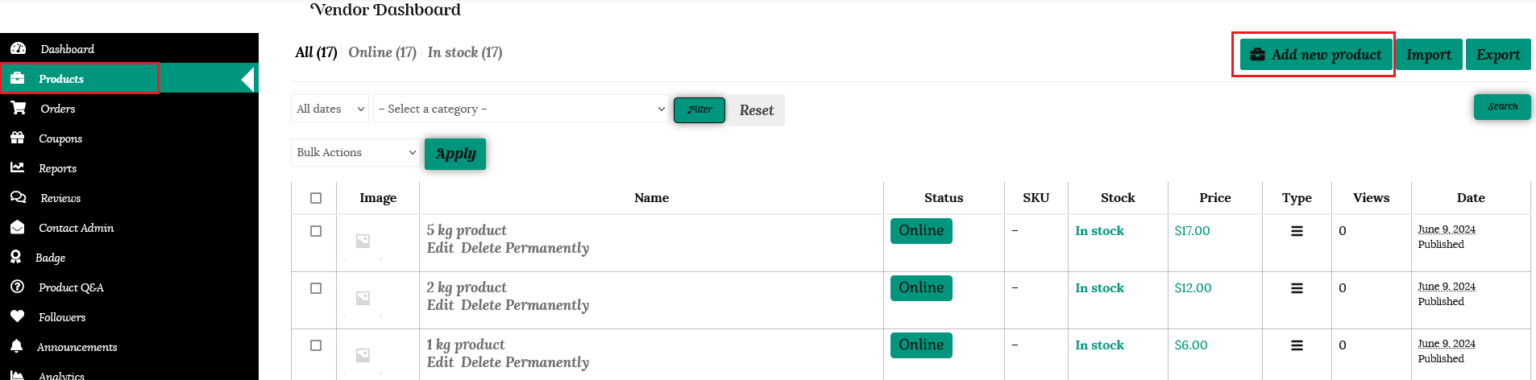
A new window will open up and you will be able to create your listing.
The more accurate details you provide will assist in a customer finding your item via the search option. Use a product title that resonate with your target audience emotionally.
A variable product is one where you offer a selection of the same product, such as colour or size, for the customer to choose. You can either list each variation separately as a standalone product, or let the customer access all variations you offer from a single page. Further details about listing a variable product can be found in the “Variable Product” section below
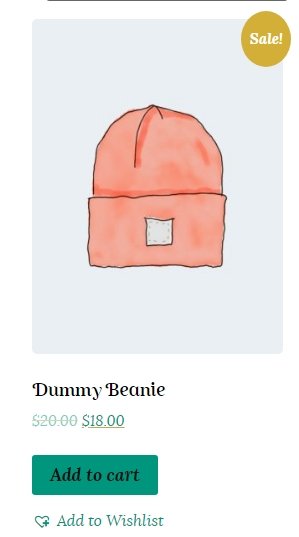
Please make this tax inclusive but do not include the shipping cost. You may also add a discounted sale price and schedule it for a certain time period. You can enter a starting date and end date to apply automatic discounts to your product.

The discounted product will be displayed with a “Sale” icon.
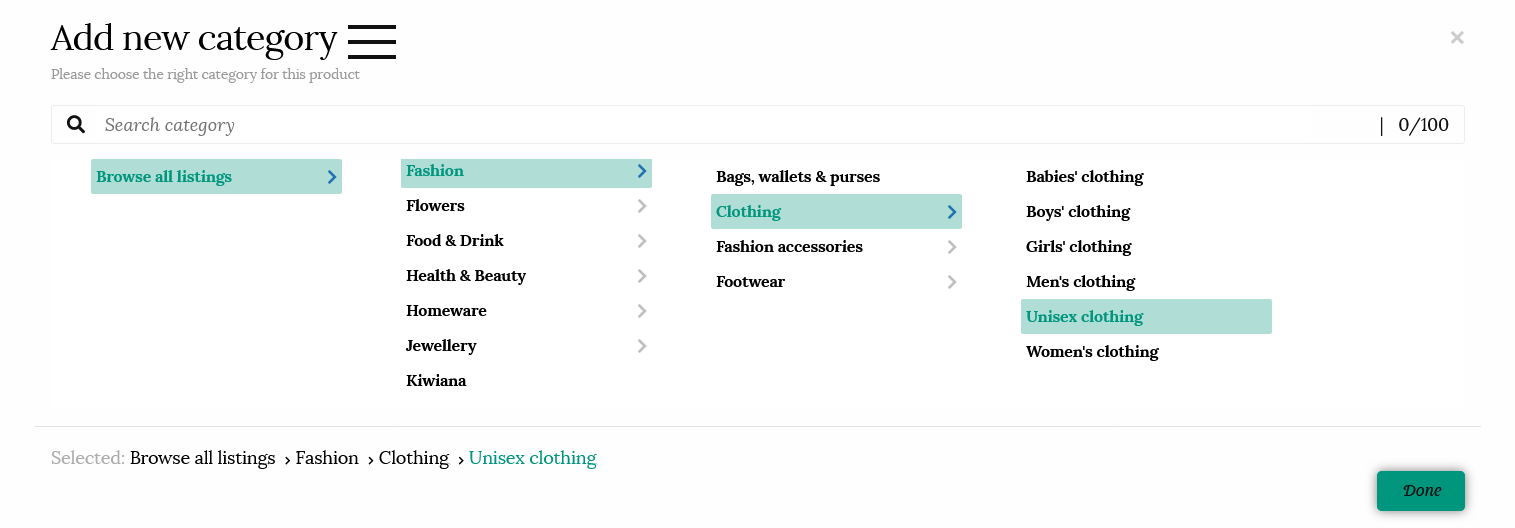
It is important that you list your items in the right category as this makes it easy for people to find the items they want – either by searching through the categories, or when they use the keyword search function.
You are only able to choose a single category as according to Google Webmaster Guidelines and other SEO and UX best practices, it is recommended to have only one category assigned to a product. You can list your product again under a different category if multiple categories apply.
You can also search for categories. Just type the category name in the search box, and you will see the matching categories.

The “Short Description” will be displayed between your product title and the add to cart button, directly to the right of your featured image, so this is what the customer will read first. This needs to be punchy and grab the viewer’s interest. See our tips below on writing a great product description.
The “Description” will show lower in the page, under your product images. Here you can add further details regarding specifications, manufacturing information etc. See our tips on what to include below.
SKU stands for Stock Keeping Unit number, is a unique number assigned to a product for, amongst other things, the purpose of keeping track of inventory. It should be a unique set of characters which will not match to any other product. If you only sell a few different products you will not need to worry about filling this out. It is more useful if you have a large inventory.

Enable Product Stock Management
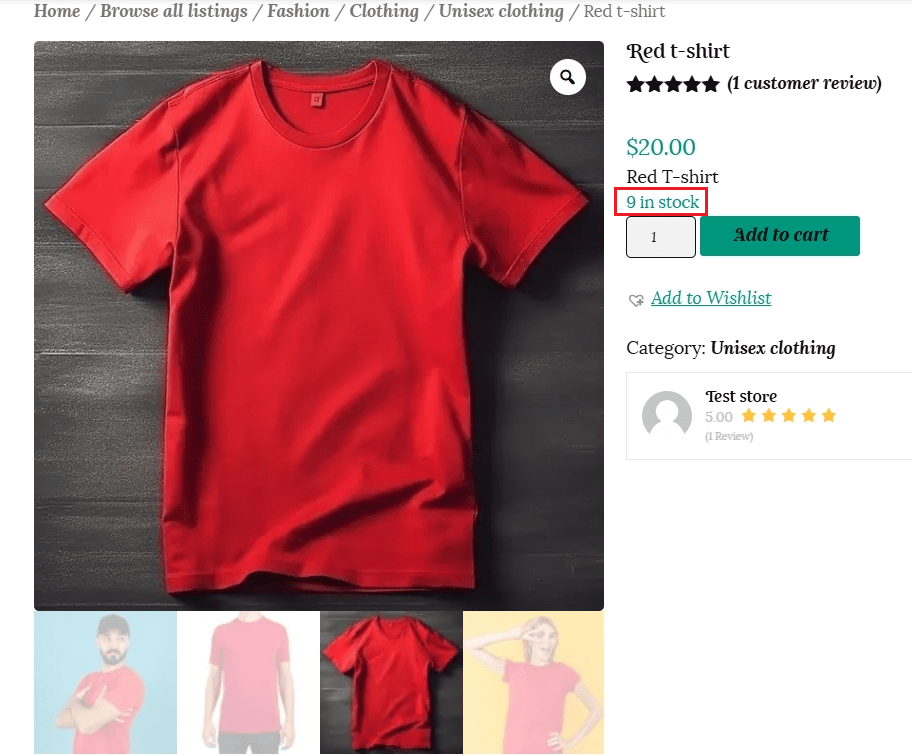
Click the box to Enable product stock management. You can fill in your stock quantity and this will be visible on your product listing.
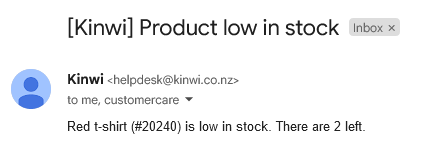
Choose a Low stock threshold and we will send you an email once your stock levels go below this number.
Once your stock level drops to 0, the listing will not be shown on the marketplace.
For the example below, we have 10 red t-shirts in stock, and will receive a low stock email once the number goes below 3.

If you would like the customer to be able to purchase only one of your products at a time, then please check this box.

The customer will receive the following error message when trying to add another item to their cart. We suggest you uncheck the Enable stock management box if you want to use this option to avoid customer angst at seeing plenty of stock, but being unable to add more to their cart.

Product add-ons allow customers to add additional items to a product and be billed separately for those items. This could be gift-wrapping options or a specific customisation. If you would like to include product add-ons in your store, please see our guide below.
Tick the box to enable shipping for your product. If you are using weight based shipping calculations, then enter the weight of your item. If you are using Shipping classes to calculate shipping then choose the shipping class for this product from the dropdown menu.

Attributes are the characteristics or properties of a product that can be used to describe or differentiate it. These attributes could include things like size, colour, material, weight, and any other relevant features of the product. You do not need to add attributes when you are listing a simple product.
In this section you can change your product status from online to draft until it is ready to go live on the marketplace.
You can also leave a note for the customer to receive on their order email.

This is the main image that will be viewed in any search, or seen by users browsing the marketplace, so make sure it is the best and most accurate representation of your product. Click on the “Upload a product cover image” button in the larger image square on the right to take you to your media gallery.
Here you can drag and drop your images or select a file from your computer. You can also access images you have previously loaded by clicking on the “Media library” button in the upper left.


Click the “Set feature image” button.

Click on the smaller image box. Here you can select and add multiple images at once from your media gallery using your CTRL key. Alternatively you can upload multiple images at once to your product gallery.
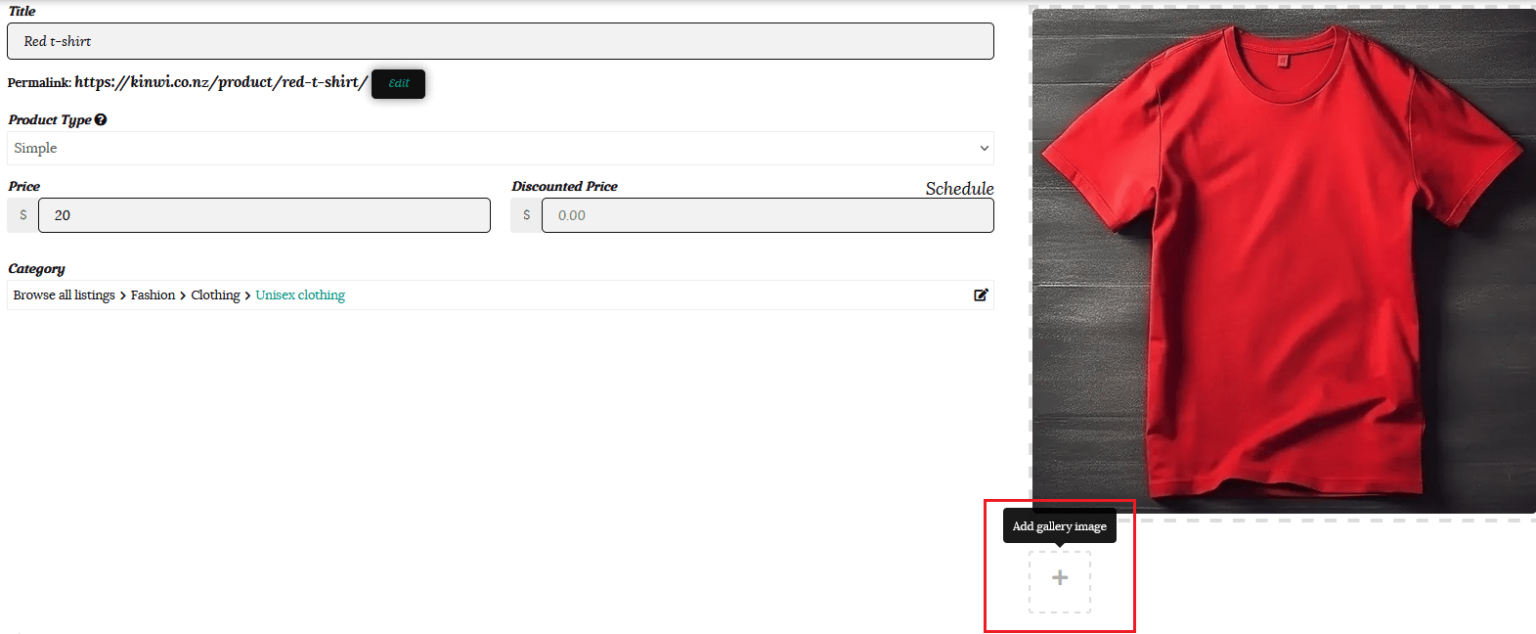
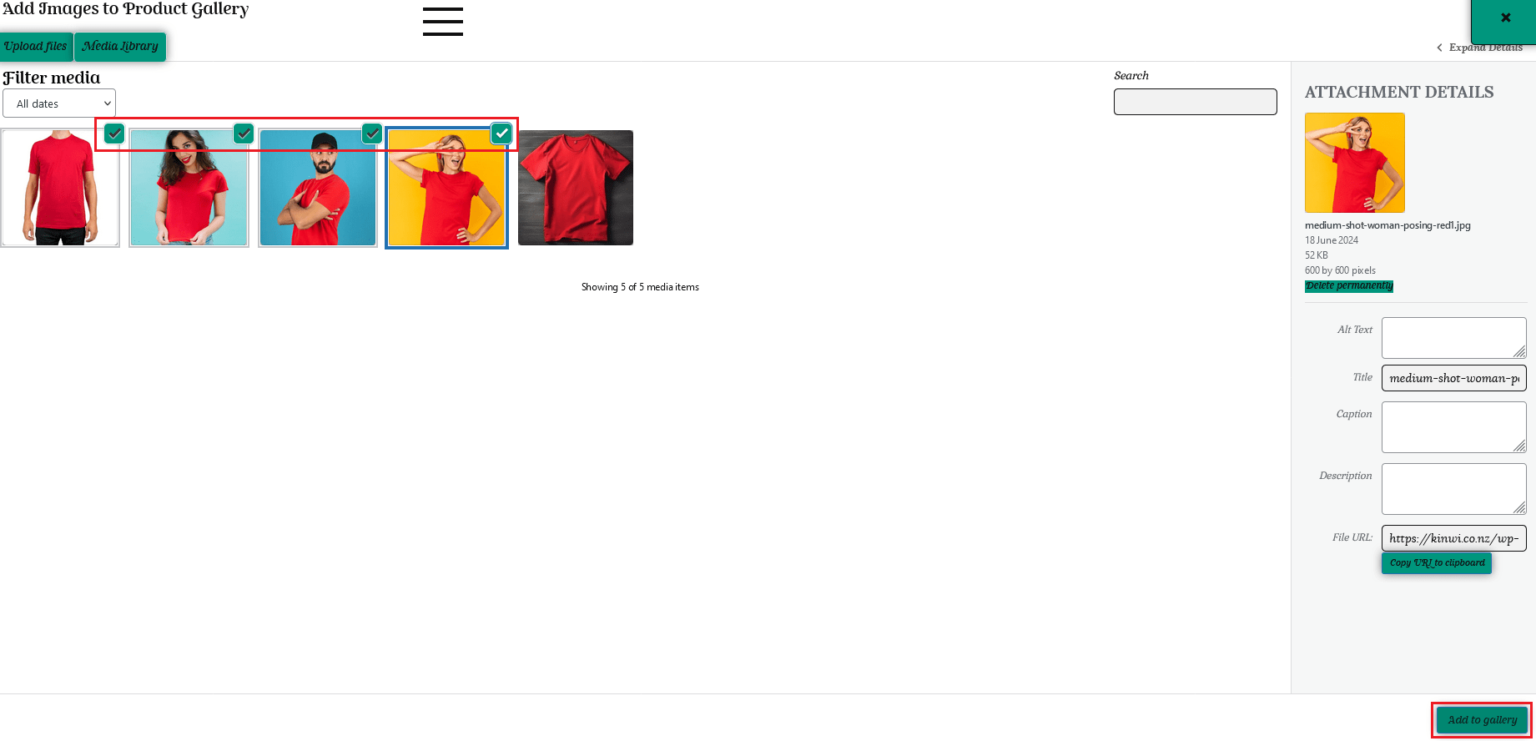
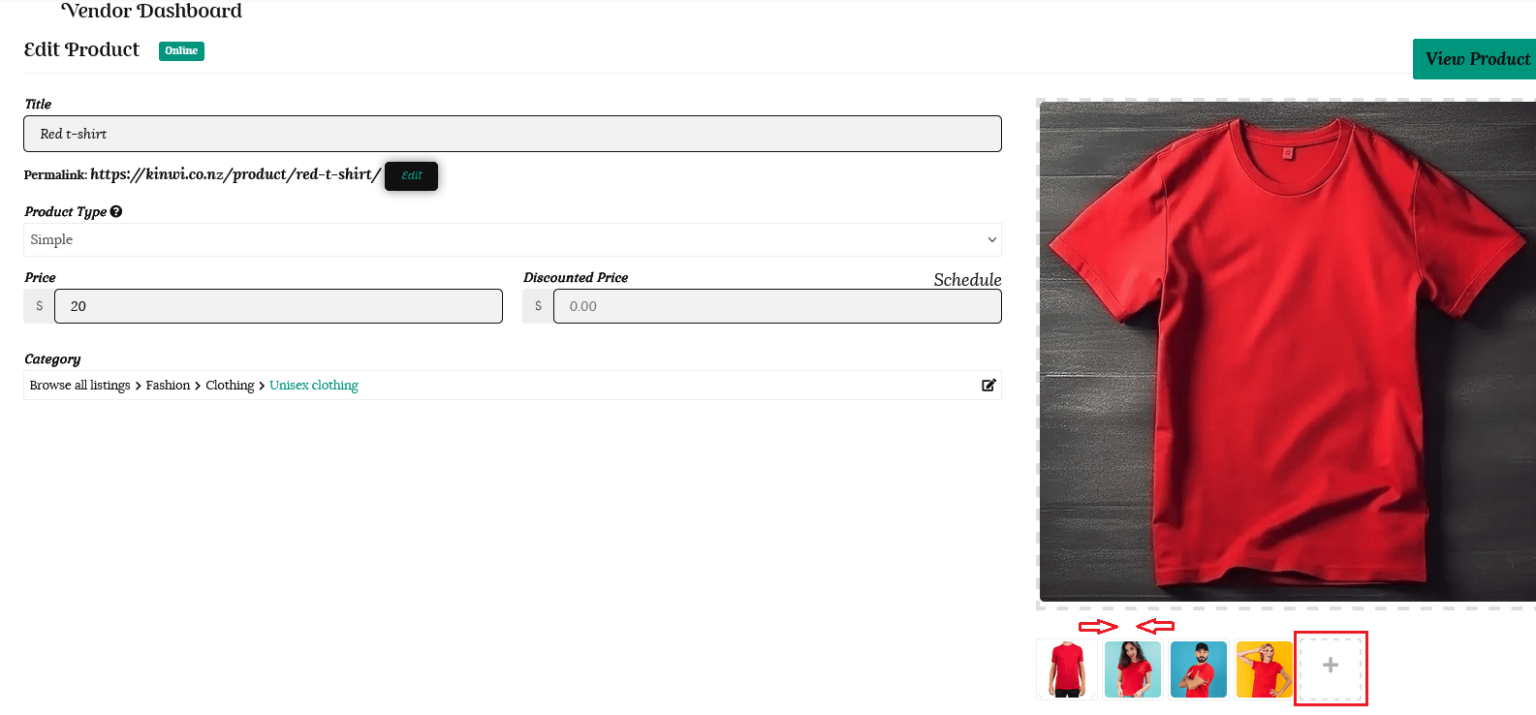
You can always add further images later by clicking on the + button in the small image box.
Drag the images to reorder them as desired.
Delete any unwanted images by clicking on the X.
We recommend your images are 600 x 600 pixels and no more than 5MB. Compatible extensions are PNG, WEBP, JPG/JPEG, BMP, or GIF.
There are free online tools such as BeFunky.com to help you resize your images.
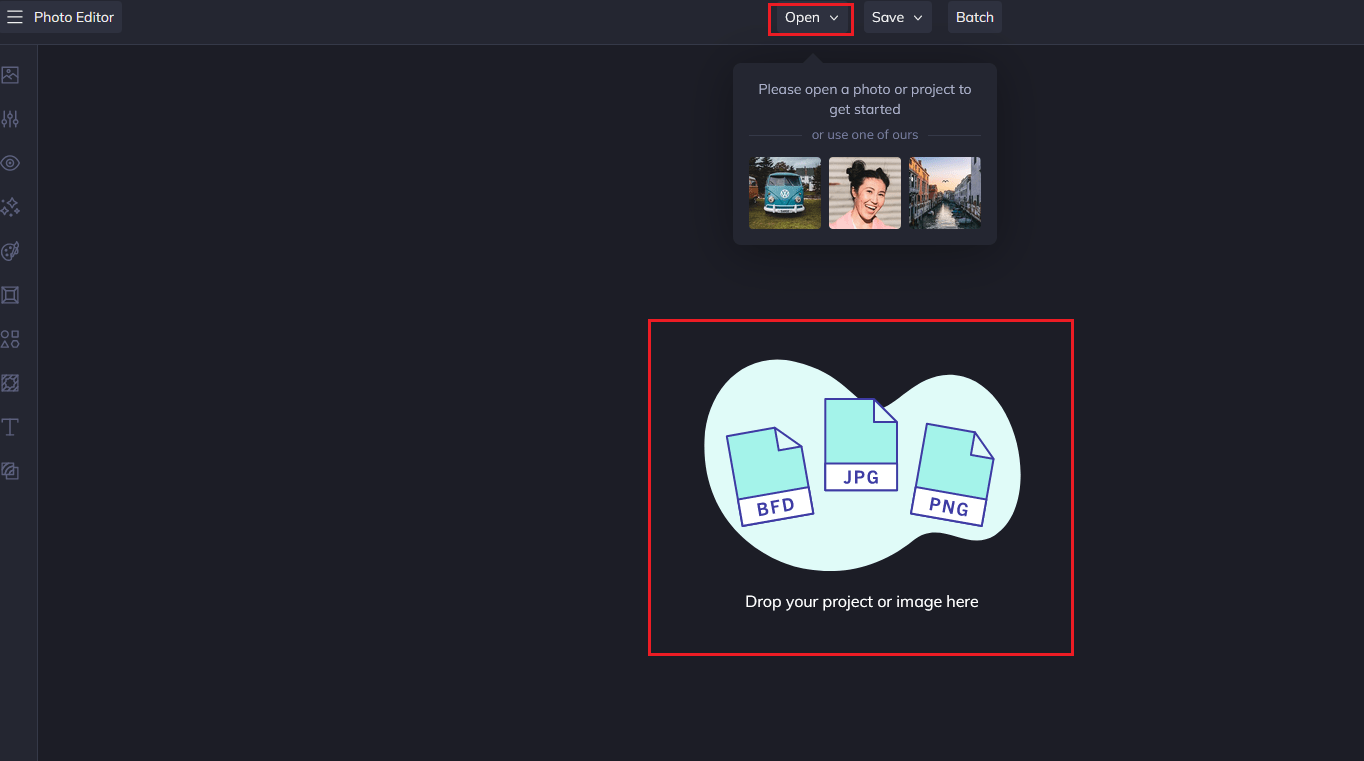
To use BeFunky.com;
1/ Open your image from a file or drag and drop it into the editor tool.
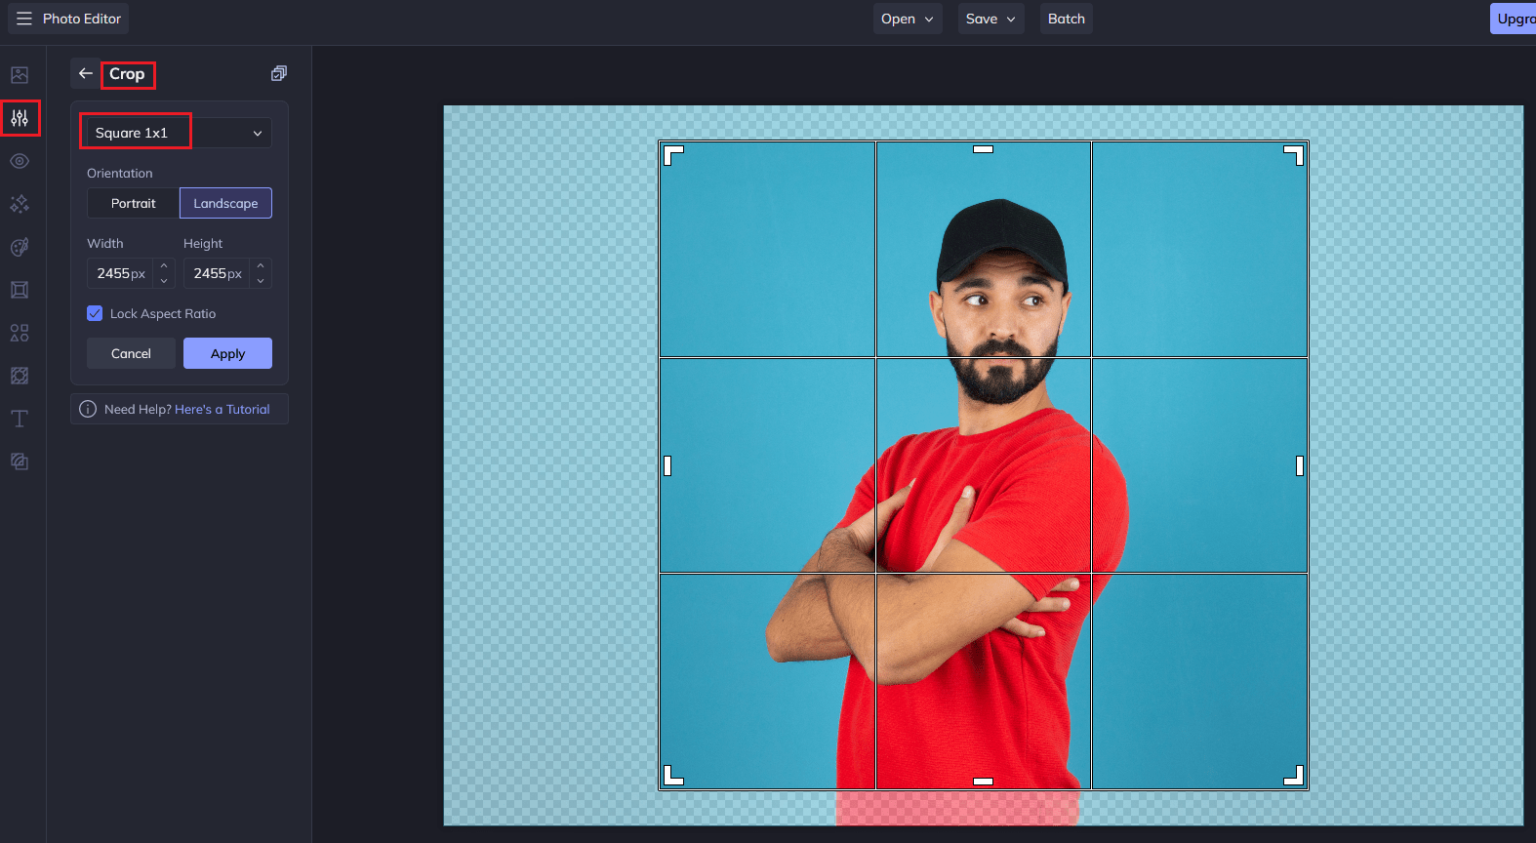
2/ Select the Edit tab and then Crop as the edit option. Choose “Square 1×1” from the dropdown. You can resize the square by dragging the selectors in and out. Centre the square over your image and click the “Apply” button.
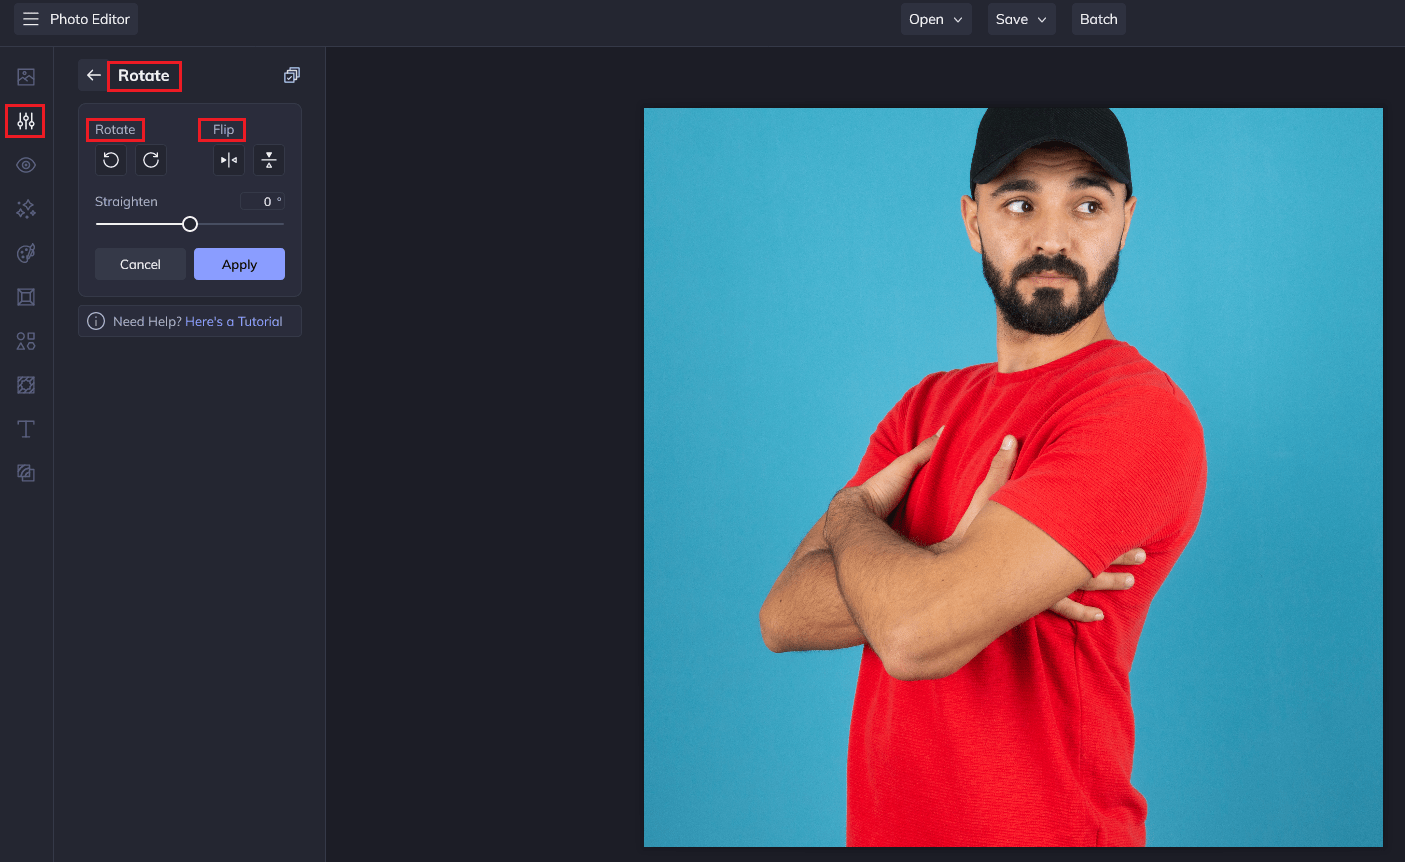
3/ You can also choose to Flip & Rotate the image if required by choosing “Crop” from the edit menu.
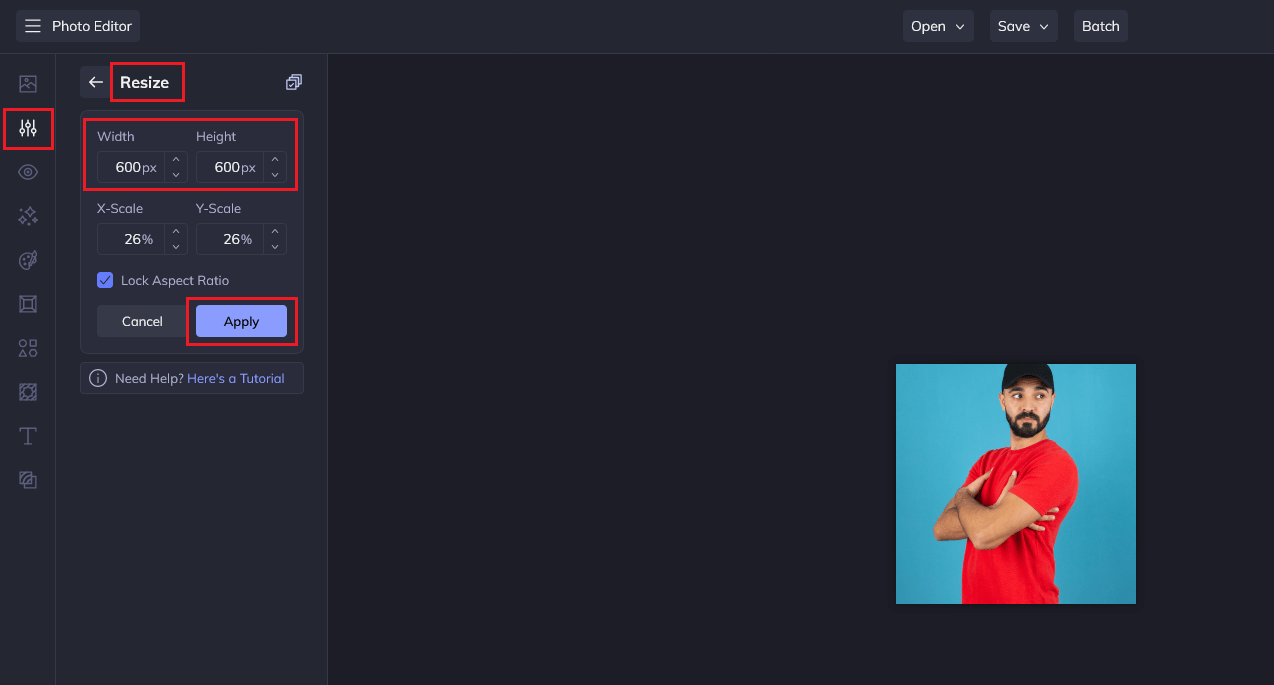
3/ Once you have your image cropped/rotated/flipped go to the Resize tab and click the resize button. Choose 600 x 600px as your dimensions and click the “Apply” button.
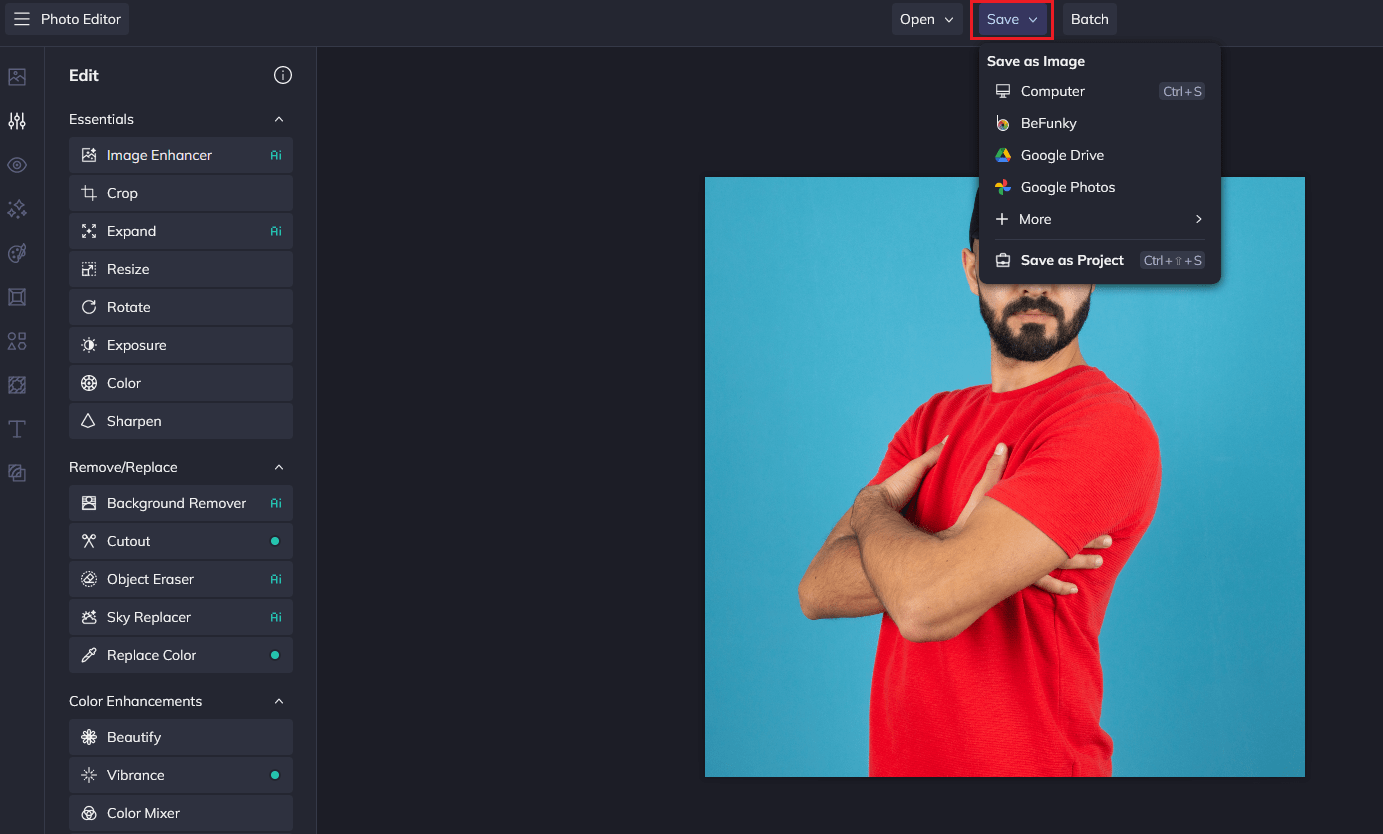
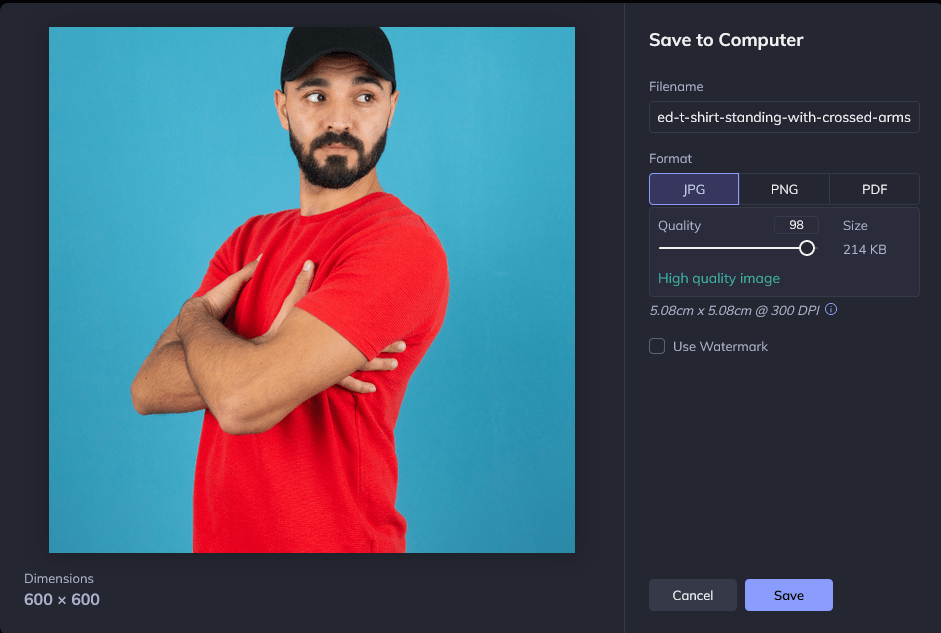
4/ You will then have the option to save the image to your device, as well as other options.
Because of the power of a picture, you should use vivid, descriptive language in your product descriptions, to create imagery. A unique and compelling product description conveys important information not only about the features of your product, but also the benefits to a shopper in owning it. The best descriptions not only convince customers that they want your product, but that they need it and can’t live without it!
Your description is extremely important in an online store as shoppers cannot physically interact with your product. This lack of physical interaction must be replaced by connection with language, photography and videos.
Tips for writing your product descriptions;
1. Know your target audience
Ask yourself who is this product for? What are they looking for in a product? What’s important to them? What isn’t? To appeal to your audience you need to understand who they are, rather than trying to please everyone. Your target audience may be a gender, an age group, a lifestyle demographic, an interest group or some other defined group of people. Remember to choose a target persona for each product description, as if you sell different products they may cater to different buyers. Once you identify who can benefit from your particular product you can speak directly to that unique person in your description.
2. Address your target audience directly and personally
Write directly to ONE person, as if your buyer is right there in front of you. Use the powerful word “you“ and the language of your target audience. Pretend you are having a direct conversation with your unique visitor about your product. This is your opportunity to be a little creative and establish a voice (personality and tone) for your brand to help build and maintain trust. Think about the emotional state of a shopper when they are searching for your product. What type of language would they use to search for it? What tone of voice would be attractive to them? Use present and future tenses to help your customers already feel like owners.
3. Turn product features into benefits & solutions
Your target audience is less interested in your product features than what they can achieve with, or how they can benefit by owning your product. Empathise with the challenges your customer faces. Applaud their aspirations. Highlight & magnify the problem before you sell the solution. What problems, glitches, and hassle does your product help solve? Make a list and consider the benefit of each of your product’s features. How will these features benefit shoppers and make them feel happier, healthier, or more productive? All key features should have a benefit, whether it’s utility, aesthetics, comfort, or simply fun. The best way to present the benefits of a product is to use descriptive and vivid language to paint a picture in the customer’s mind. For example, if you make reusable, recycled bags you can make the buyer feel good about purchasing your product by drawing attention to the plight of our planet, or even sea turtles due to our use of plastic bags.
4. Sell an experience, not just a product
Help a customer imagine your product is already in their possession and visualise what it is like to experience the use of your product. Start a sentence with the word “imagine,” and finish by explaining how your reader will feel when owning and using your product. For example, … imagine how confident you will be to step out, feeling like a princess, every time you wear your beautiful, unique, handcrafted necklace. Use sensory language (sight, sound, taste, touch, smell) to explain how the customer will feel, without telling them how to feel that. Highlight surprising or unconventional benefits of your product.
5. When & where would your product be used?
Is it meant to be used during a certain time of day, seasonally or for a specific type of occasion? Is it meant for indoor or outdoor use? For your car or home? Paint a picture for the customer to highlight the ideal scenario for using your product. For example, you could state that your cosy, crocheted blanket is perfect for snuggling on cold winter nights with a cup of hot chocolate by the fire.
6. Use story telling
Does your product have a back story that is special to you? Using that short story in your description will make it more likely to engage your audience and make your product endearing to them. Examples include, your inspiration for creating your product, or any challenges you had to overcome. The use of nostalgia is powerful – you can include positive memories in your descriptions. Likewise, the use of humour to give shoppers a laugh can ease the stress of buying and create a positive impression – as long as it fits your brand.
7. List your product’s basic details
It is important to proactively include relevant details and directions to anticipate and prevent returns.
These need to know specifications can be presented in a bulleted list at the end of your description and include;
8. Add Videos
Using short clips in your product page can be a great way to showcase your product and increase conversion by giving customers the full experience of the item.
9. Use social proof
Encouraging your customers to leave reviews is a wonderful way to increase your credibility. This helps to minimise any remaining purchase hurdles.
10. Read your description aloud
Before your finalise it, read your description aloud to gauge whether it sounds like a real conversation you’d have with your target audience. It should flow without dragging on long sentences or awkward words. Does the tone sound enthusiastic and positive, so that your passion for your product shines through?
11. Have you checked for correct grammar and spelling?
Lastly, once you have finished your description, make sure your spelling and grammar is 100% correct. Taking the time to make sure this is perfect can go a long way in establishing professionalism, trust, credibility and product quality.
Studies have shown that most people explore the images first when they arrive on a product page. “A product image says a thousand words.” So no matter how great your product description is, if your product images are blurry and unclear it will be much harder to entice a customer to make a purchase. Providing a customer with as much visual information as possible is the key to encouraging them to purchase your item and also reduce the risk of returns and chargebacks.
To open your media library at any time, simply click on the add image box in any product listing.

To open your media library at any time, you can click on the add image box in any product listing.
Here you can click on any image and see the image details in a panel on the right hand side.
Details include the name, date it was added and size. You also have the option of deleting the image permanently.
We recommend that you fill in the Alt Text, Title, Caption and Description boxes for each image you upload. This will help Search Engines find your products, provide details for customers with impaired sight and provide further information to customers using the caption option.
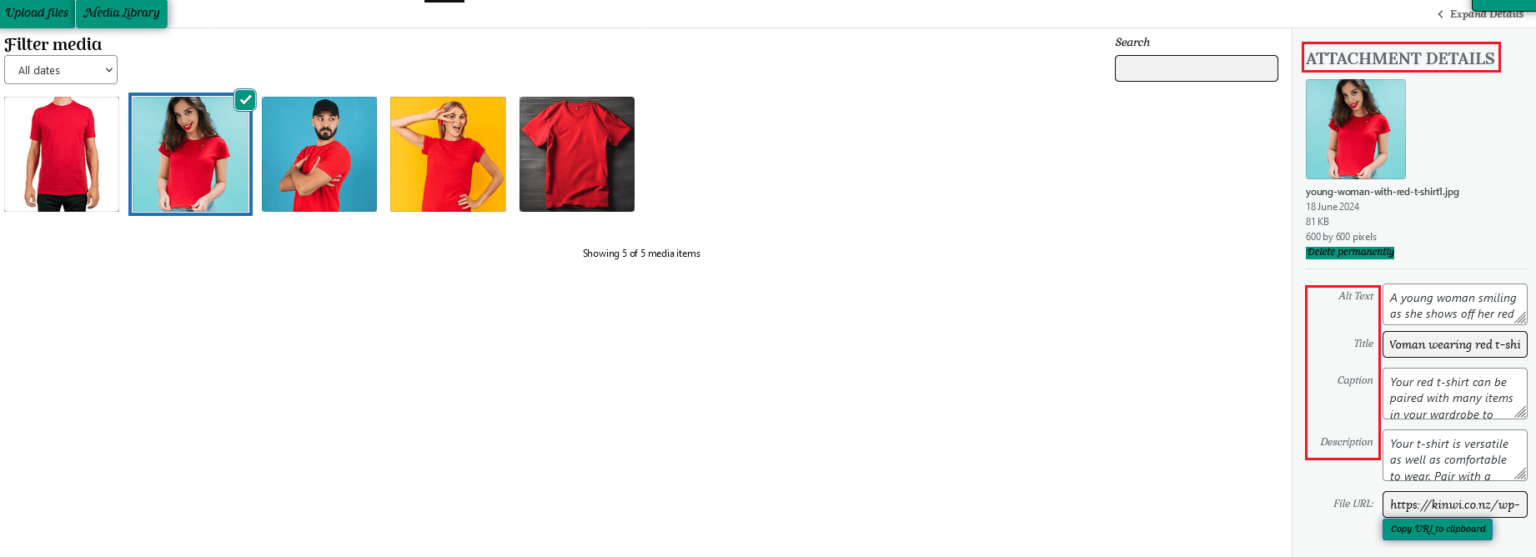
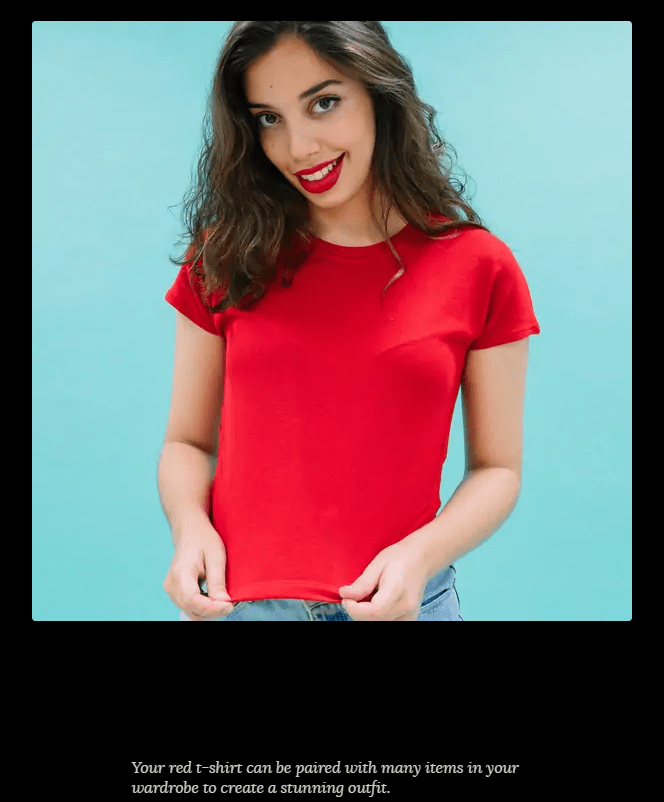
The caption will be shown to the customer underneath each image when it is enlarged.
If “a product image says a thousand words,” then a video clip says tens of thousands!
You can embed a Youtube clip into your product description. As well as showing your product, you could also show your process in creating your product. For example, if your store lists alpaca-wool products, you could include a video showing your alpacas.
Please ensure your video does not include any link to encourage a customer to complete their purchase away from the Kinwi marketplace. This will result in your selling account being suspended.
Embedding a video into your product description
If you wish to add a video into your product description, please follow the steps below;
1/ Go to the video page on YouTube and copy the URL. To get the URL link, right click on any YouTube video and select “copy video URL.”
2/ Click on the”Add Media” button under the product Description.

3/ Click the “Insert from URL” button and paste your copied URL into the media gallery link box.
4/ Click on the “Insert into post” button.
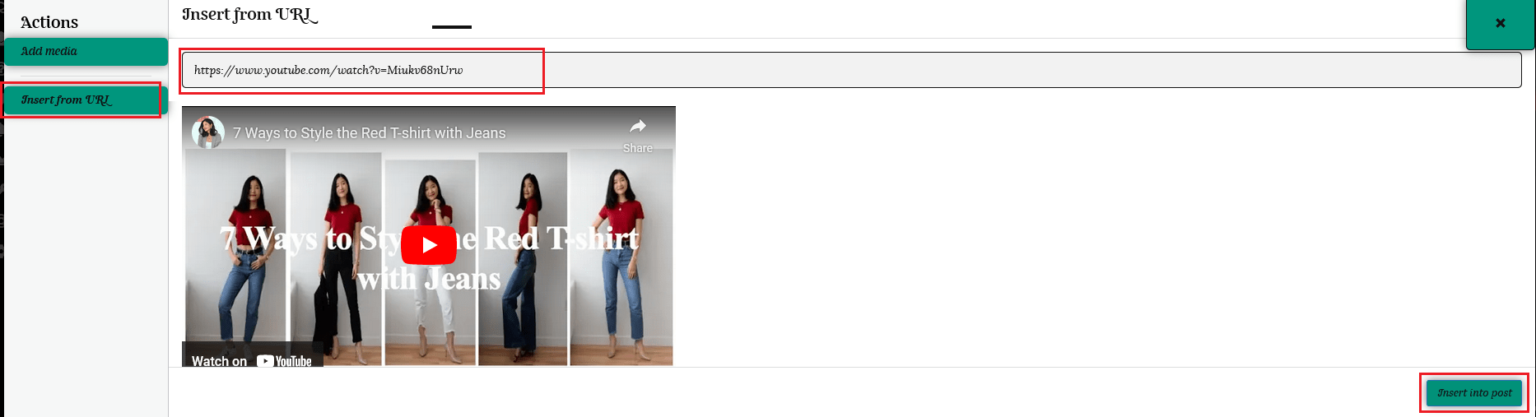
You will see the link embedded in your product description. You can copy and paste it to move it wherever you prefer in your product description post.

Using the example in our test store, this how the customer will view the video in your product description.

A variable product is one where you offer a selection of the same product, such as colour or size, for the customer to choose. You can either list each variation separately or let the customer access all variations you offer from a single page.
Selecting “Variable” as the product type lets you offer a set of variations on a product, with control over prices, stock, images, and more for each variation. You can use them for a product like a t-shirt for example, which you can offer in large, medium, and small sizes, all in different colors.
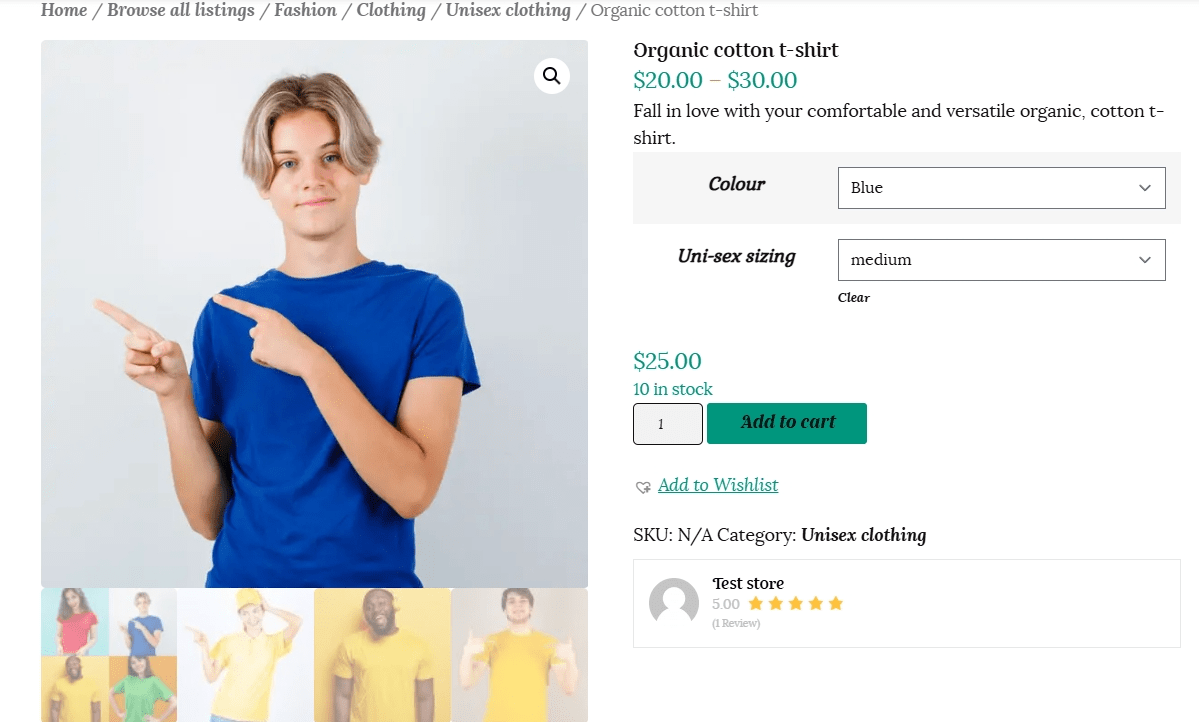
When customers view a variable product, they encounter dropdown fields to select variation options. The Add to cart button is greyed out until all selections are made. Once customers select all options, the available stock and price display. To add the variable product to the cart, customers need to select all options.
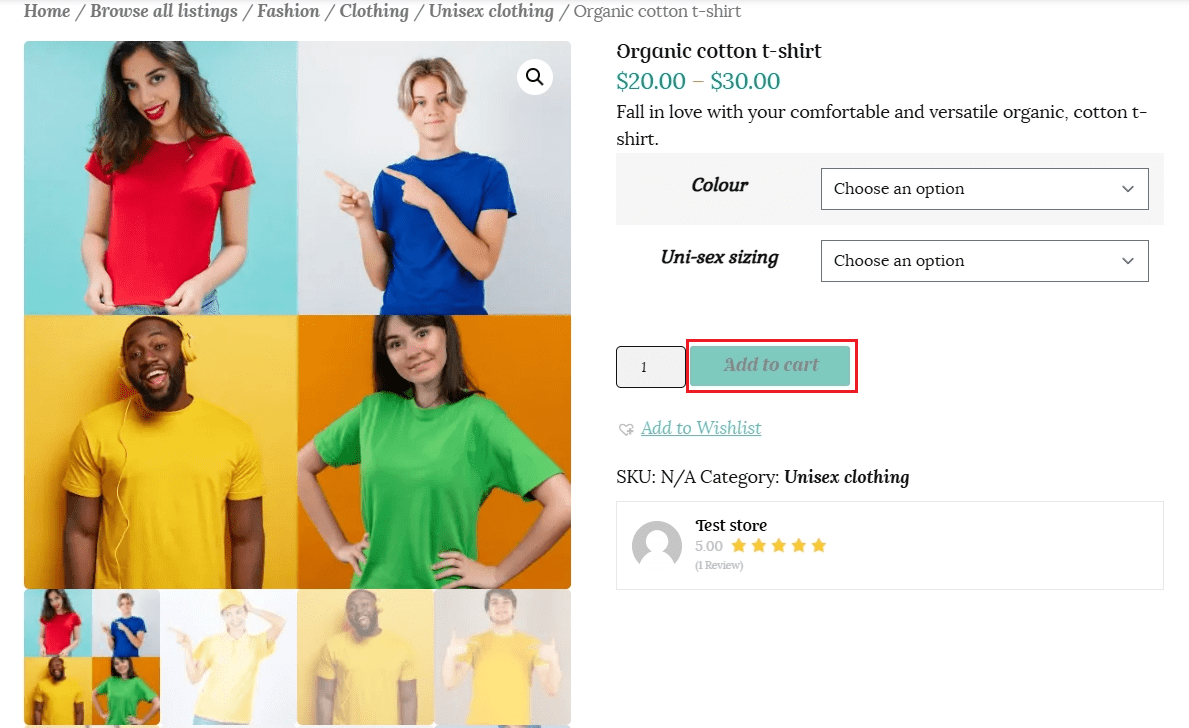
Once the customer chooses all the variation options they will be able to add the product to their cart.
To list a variable product, select “Variable” from the drop down menu under “Product Type.”
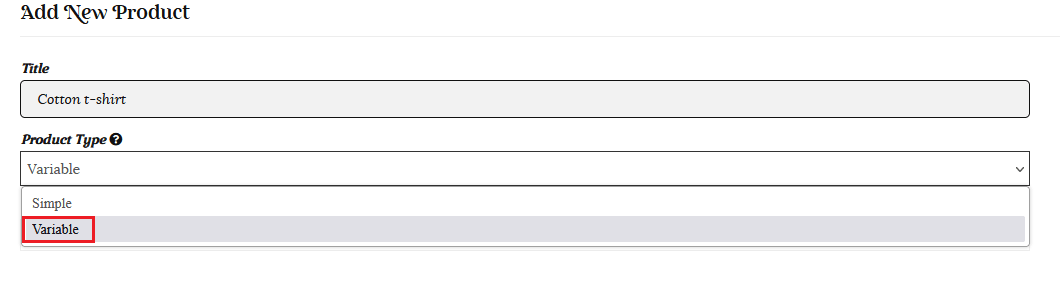
Fill in the title, category and description for your base product, as detailed in the steps above for a simple product.
Add your feature image and any other gallery images you would like to include. You also have the option of choosing a default selection as the feature image as detailed below.
When you select the variable product type, the price boxes will not show under the product type as the price may differ for the variations you offer.

A new “Attribute and Variation” section will be added further down the page.

Attributes: Attributes are the characteristics or properties of a product that can be used to describe or differentiate it. These attributes could include things like size, color, material, brand, weight, and any other relevant features of the product. Attributes provide important information to customers, helping them make informed purchasing decisions.
Variations: Variations are specific options or choices within an attribute. For example, if the attribute is “colour,” variations could include red, blue, green, etc. Similarly, if the attribute is “size,” variations could include small, medium, large, etc. Variations allow customers to select the specific options they want for a product.
Click on the dropdown menu and select the Attribute for your product if it is listed.
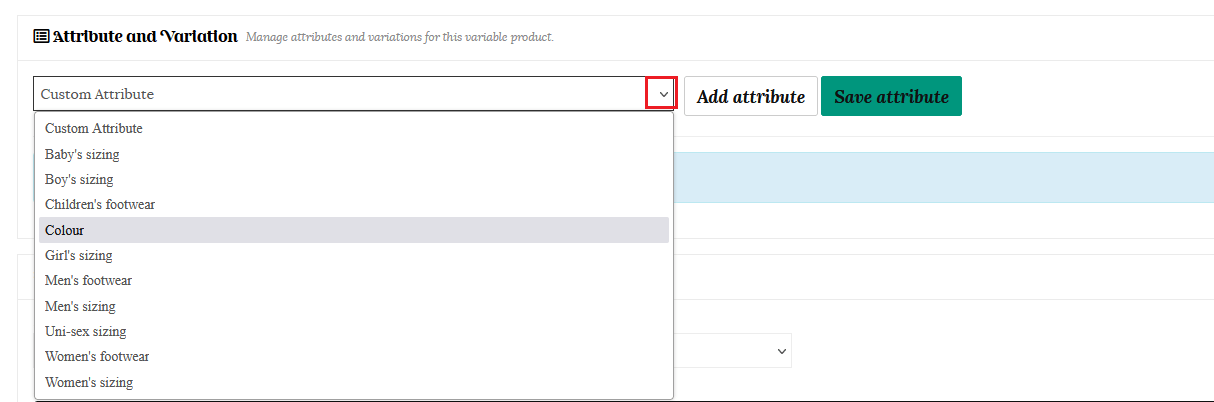
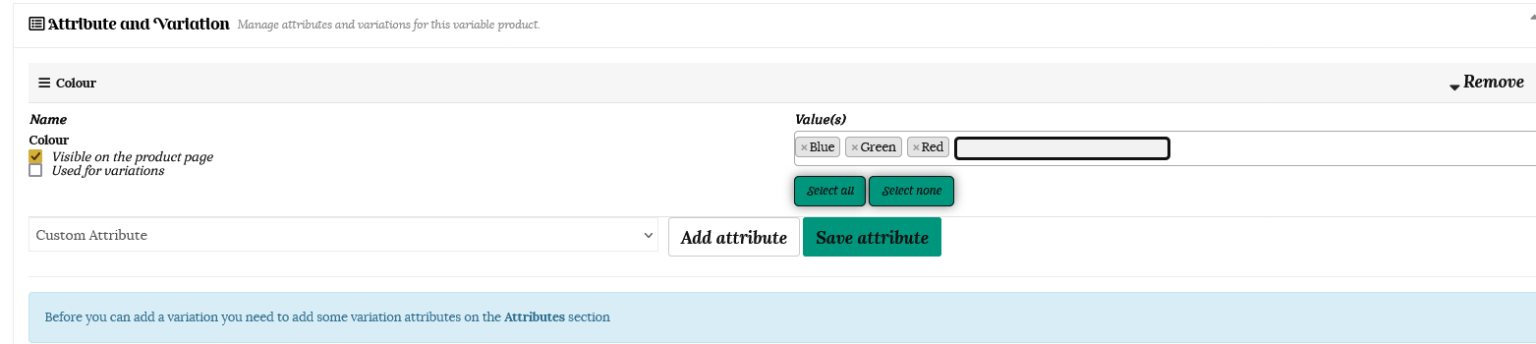
For this example we are selecting colour. click the “Add attribute” button and a new form will open up where you can select your colour options.
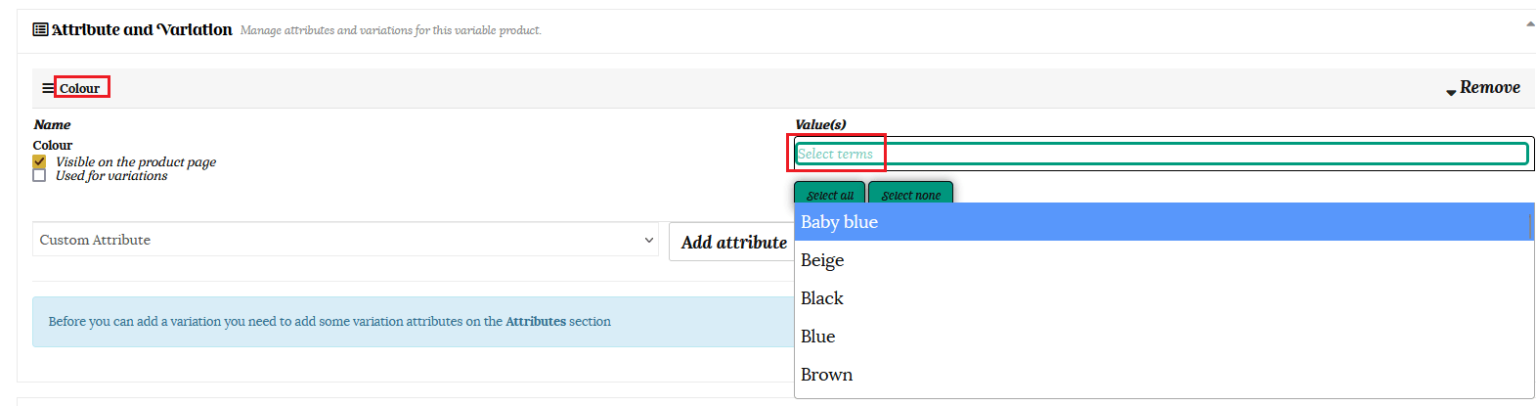
If the variation is not pre-listed, you are able to click the “Add now” button to add a new selection.

We have selected Blue, Green & Red as our colour options.
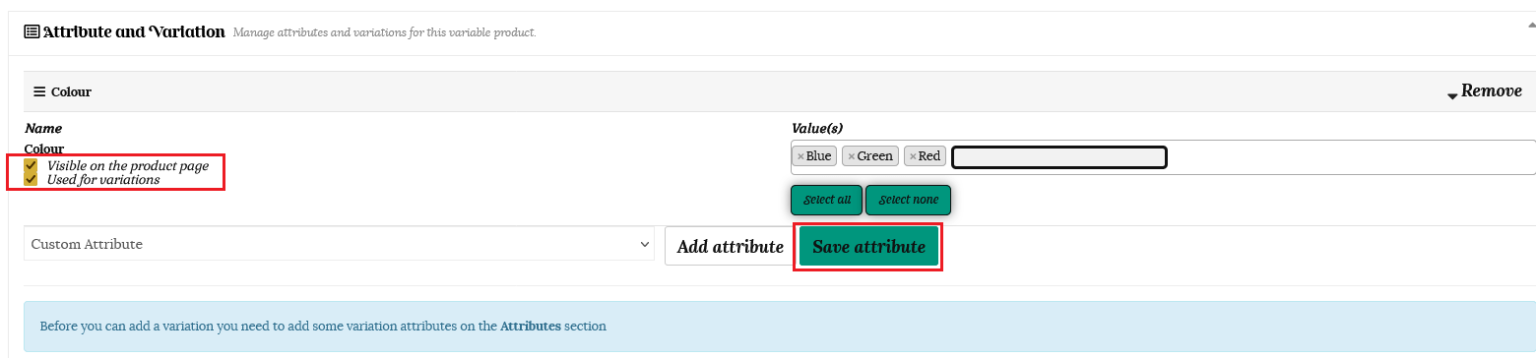
Once you have selected your values, ensure that both the “visible on product page” and “Used for variations” options are checked before clicking the “Save attribute” button.
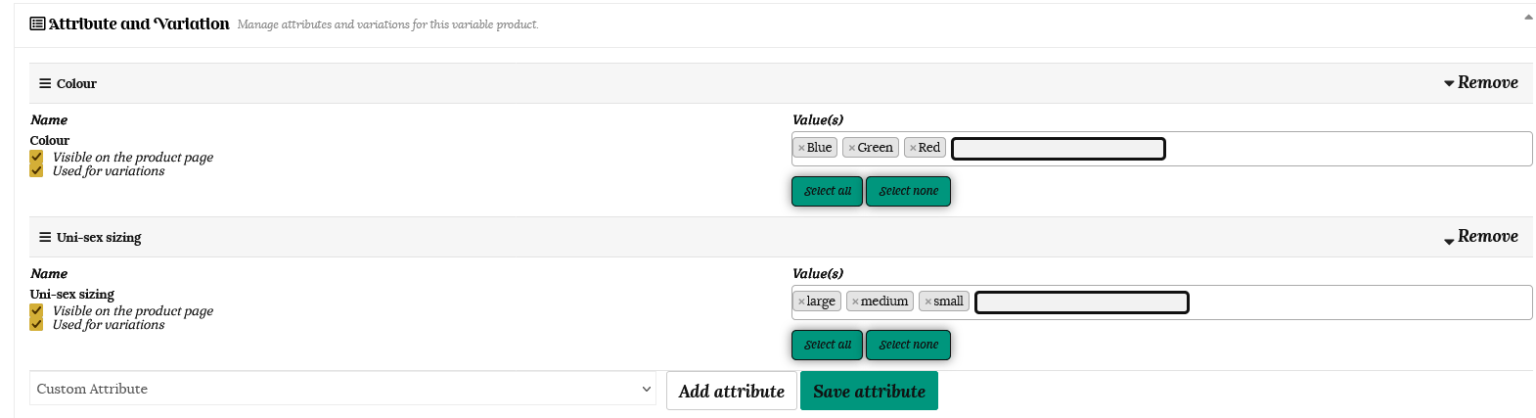
For our example, we will repeat the steps above to also add Uni-sex sizing as an attribute. We have chosen large, medium and small as the variation values. Make sure you click the “Save attribute” button to save your choices.
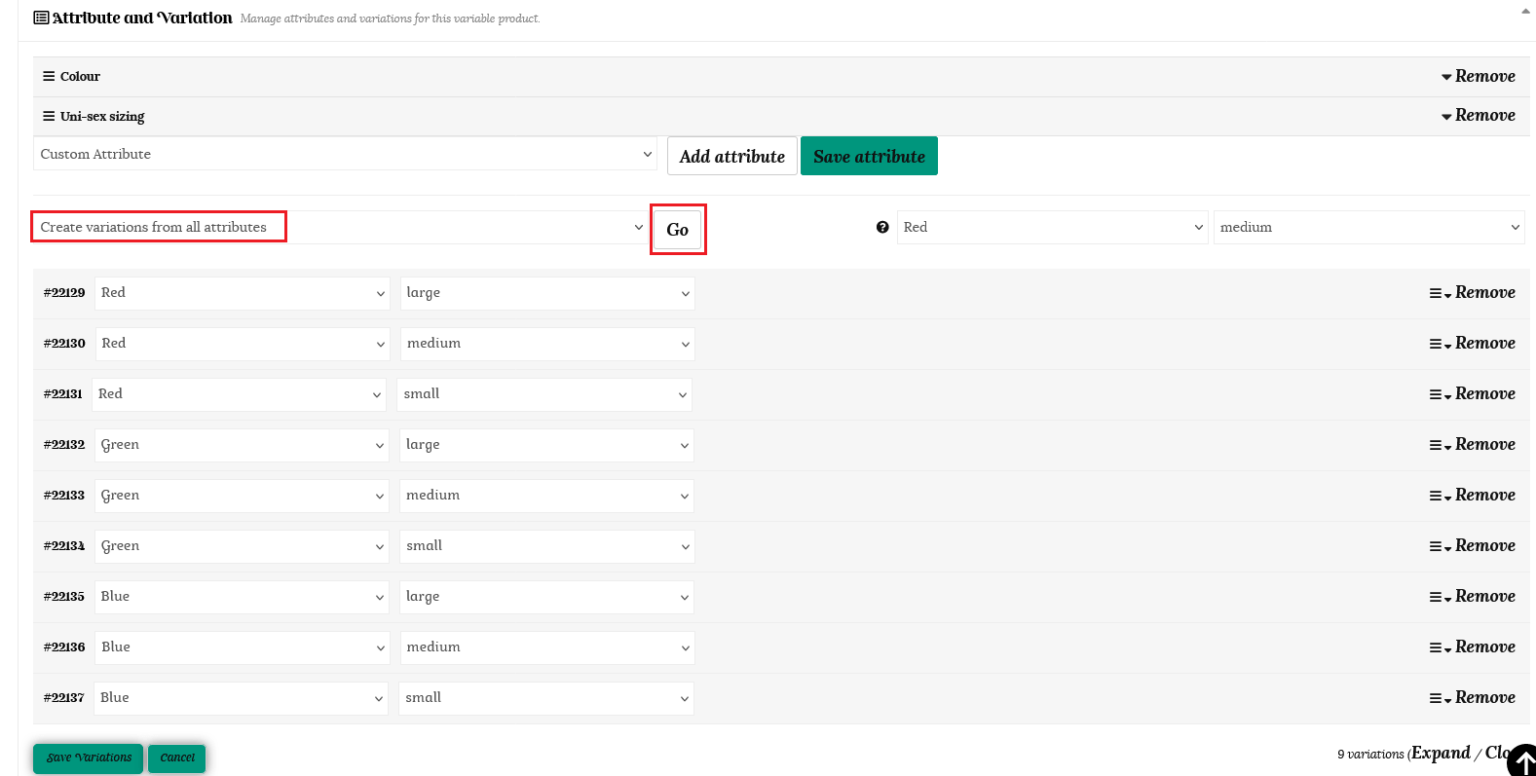
To automatically create all available variations from your selected choices, select “Create variations from all attributes” from the dropdown menu and click “Go.” You will now see a list of all your variations. You also have the option of manually specifying which variable will be available for the product. Select “Add variation” to add each variation manually.
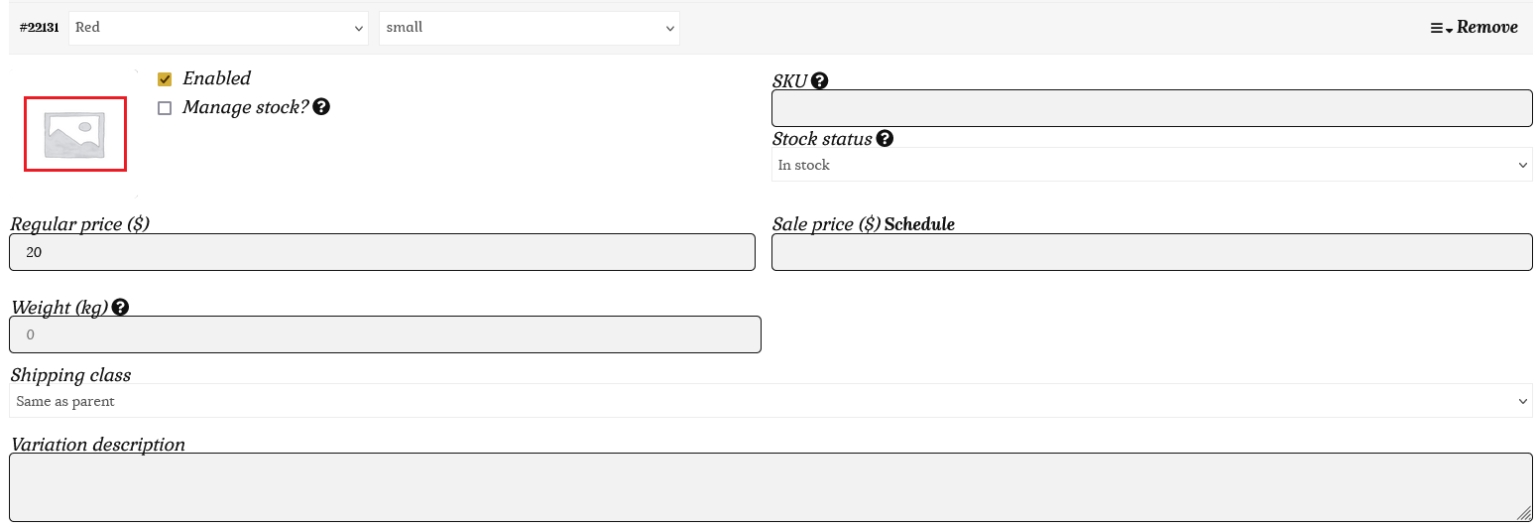
You can now add the remaining details to each variation in the same way as detailed in the simple product listing above. Click on each variation in turn to expand the variation settings.
Each variation can have the following properties:
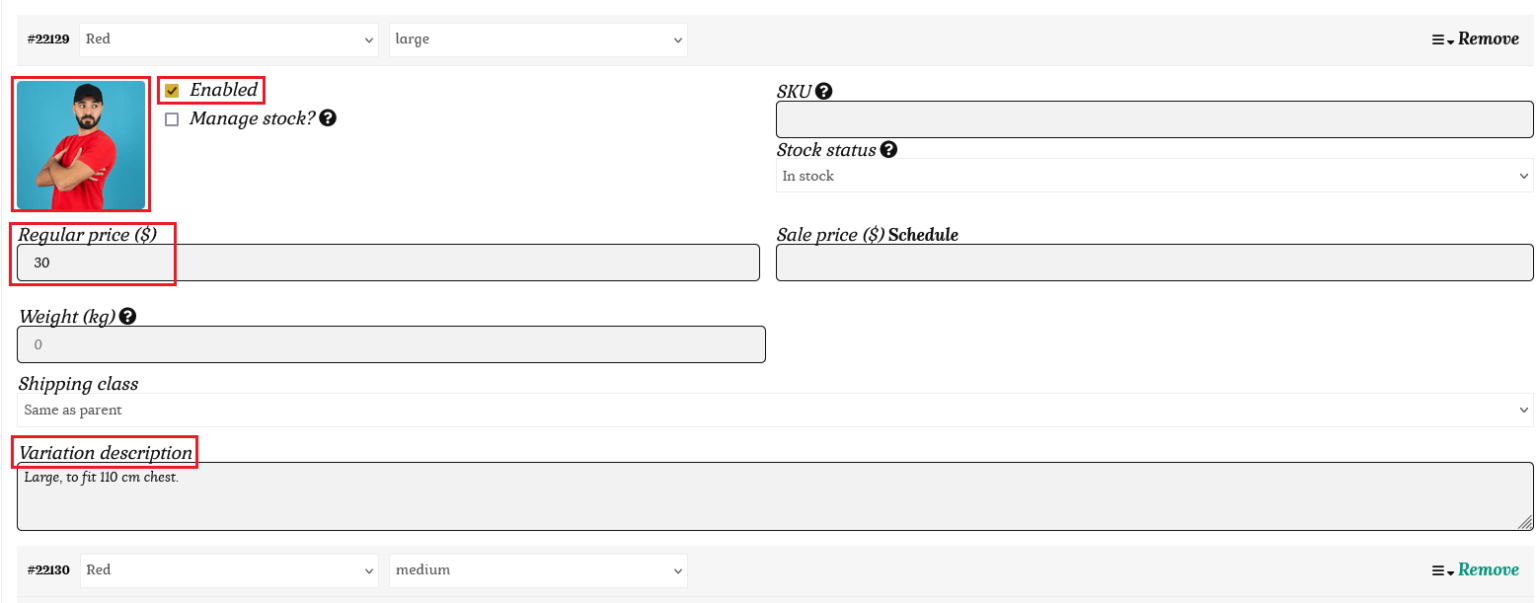
Please ensure you tick the “Enable” box and enter a “Regular price” or this variation will not show as an option to the customer.
To add an image for each variation, click the image placeholder. Select the image for the variation and click “Save Product” to finalise the changes.
Please note these images show to the customer for the selected variation only, and will not show up in the product gallery images. You will have to add them separately if you want them to show in the product gallery itself.
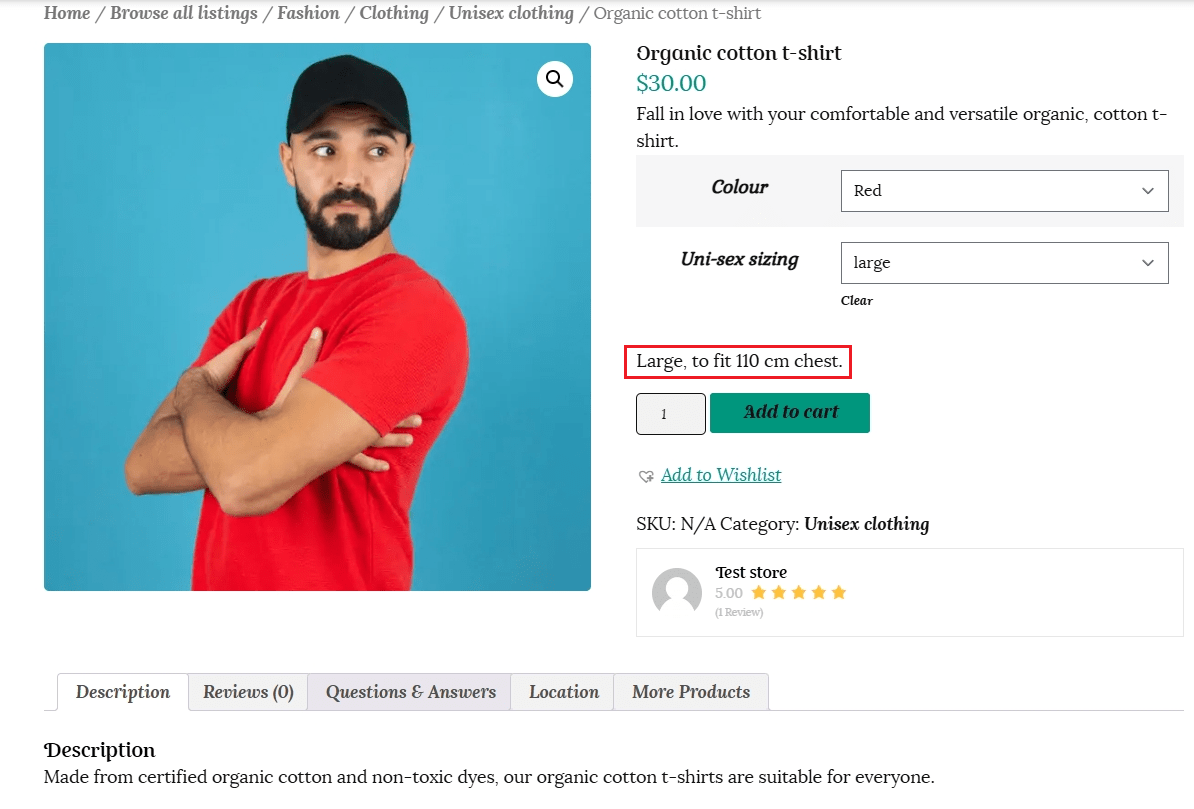
The variation description will show on the product page under the selection boxes. Include any details you would like the customer to know relevant to that particular variation.
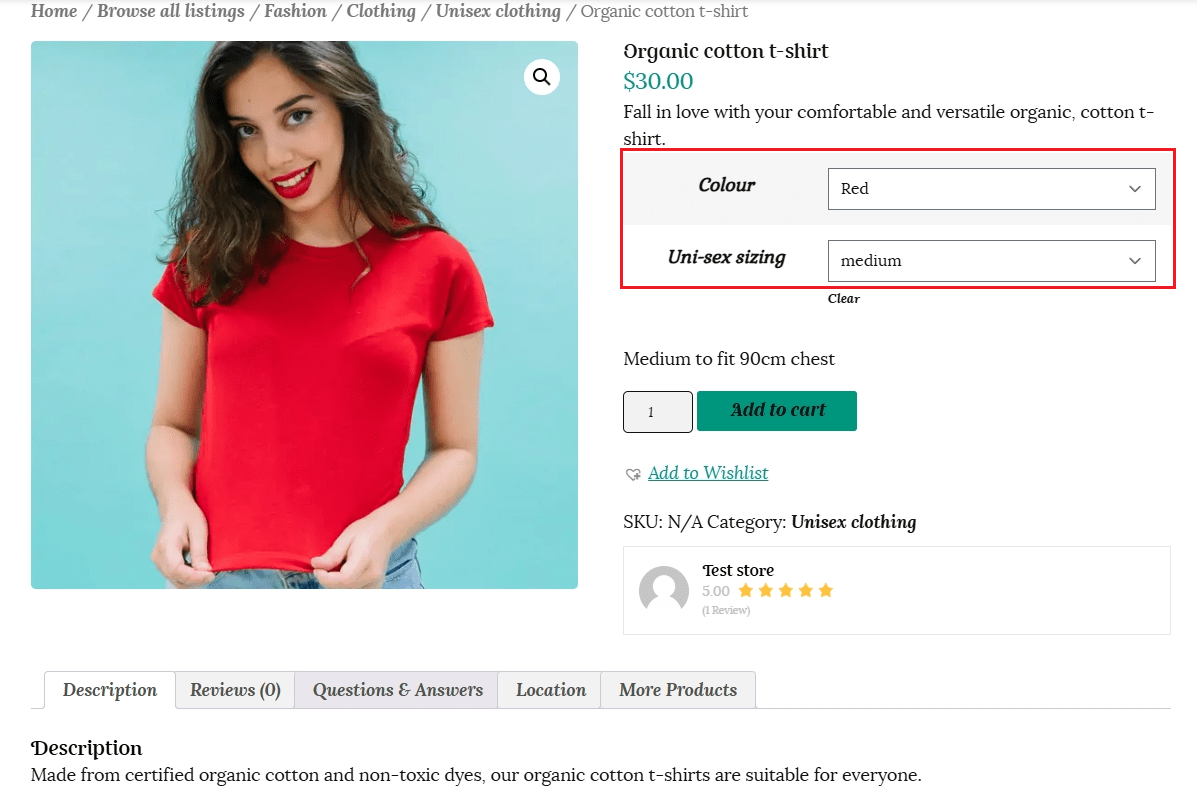
This is how the variation above will appear to the customer.
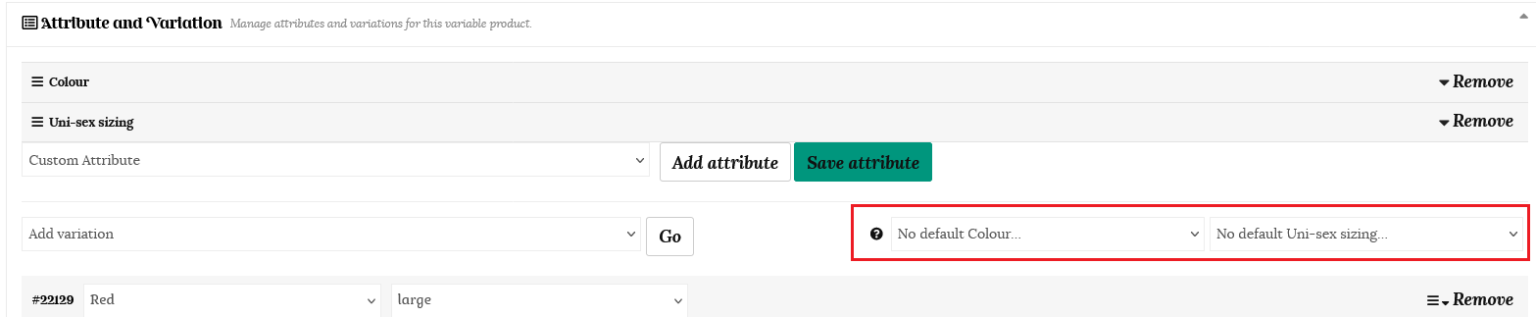
You can choose to set a main image and product gallery as detailed under “Listing a simple product” above, or set a default variation option.
To set a default option, choose from the dropdown menus as shown below.
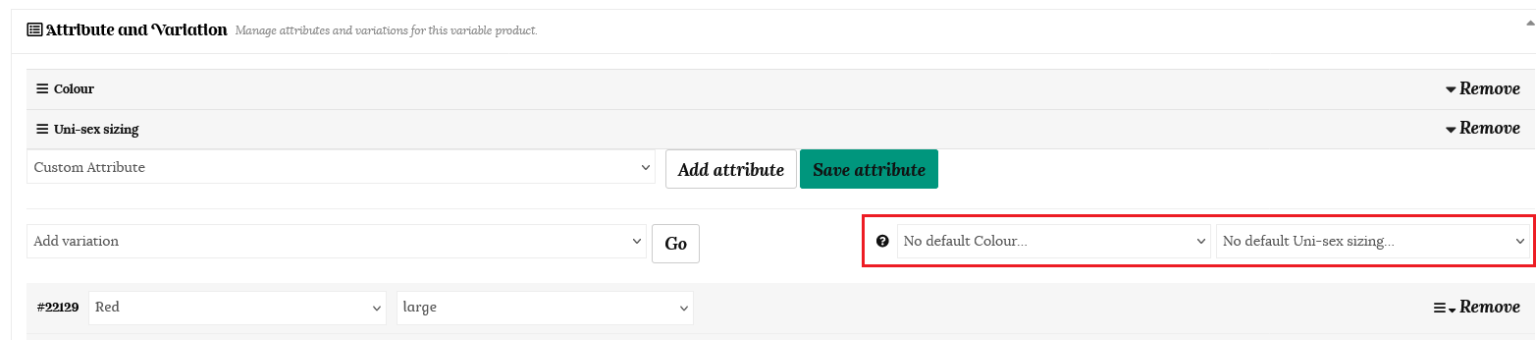
For example, if we choose red as the colour and medium as the default size, then the customer will be shown this option by default when they land on your product page.

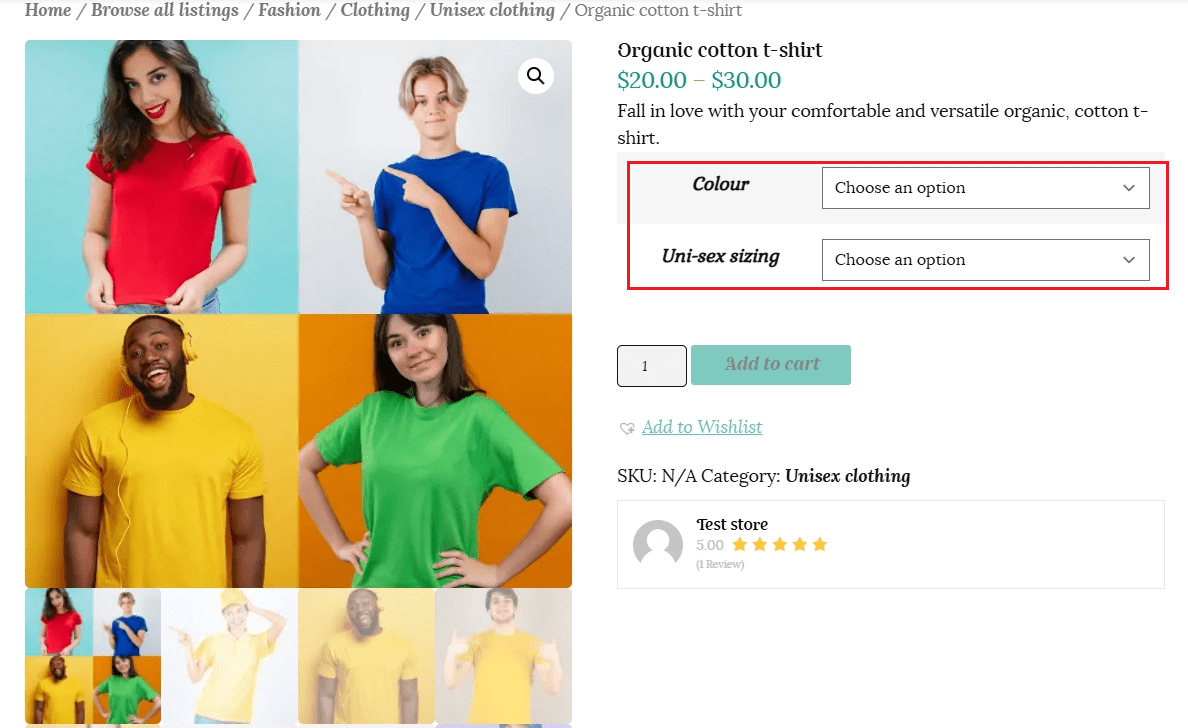
If we choose no default variation, then our feature image will be shown. Any images loaded into the image gallery on the main product page will be able to be viewed with each variation.
This is how it will look from the customer’s point of view.
If you have a variation in prices for each selection, this range will show under the product title, and the price for each variation will only show once the customer makes a selection.

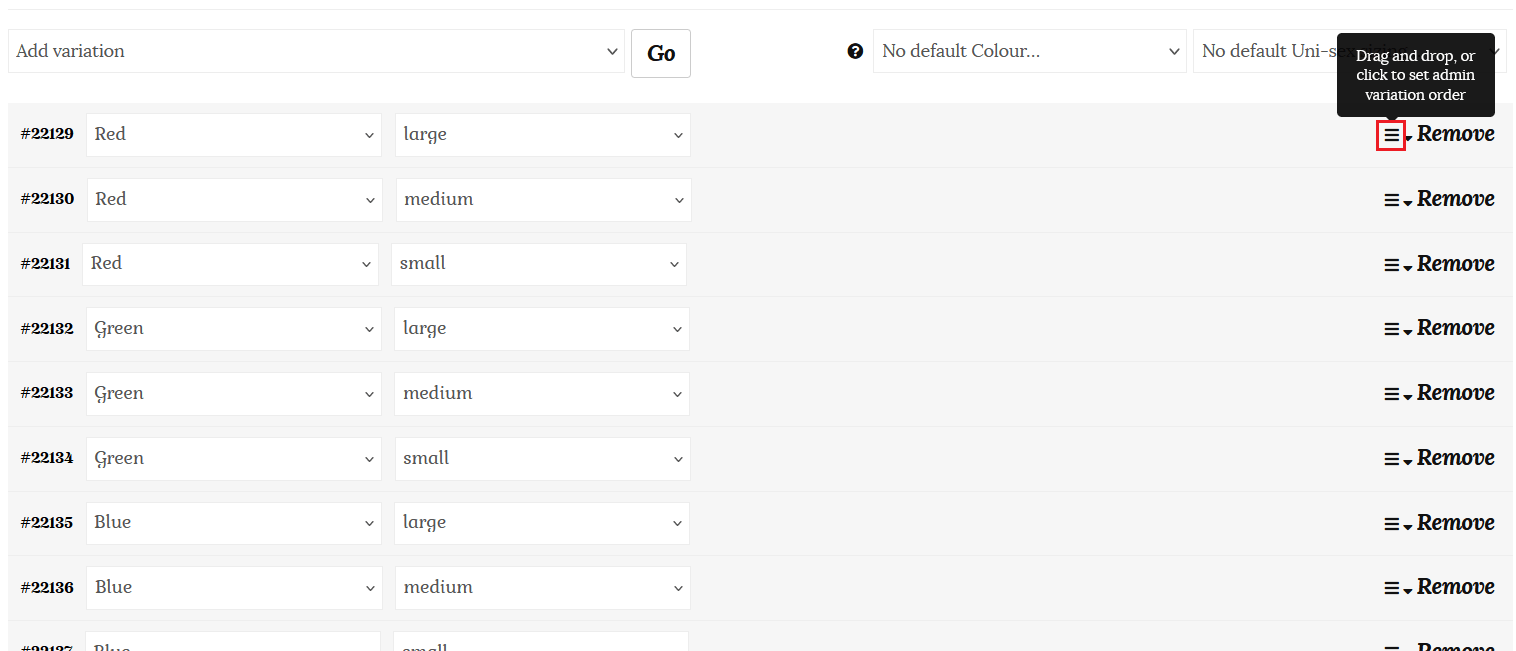
You are able to change the order of your variations by clicking the menu icon (three-lined “handle”) as shown below and choosing the order position of the variation directly, or drag and drop the menu icons (the three-lined “handle”) to reorder. In the customer’s view, the selection fields of a variable product display in the same order as you sort them in your admin area.
Make sure you click “Save variations” when you have finished editing.
The values will also appear in the product dropdown in your store in the same order as you enter them in the “values” field. These can be edited by removing/deleting a value and re-entering the values in the order they should appear. Click “Save Attributes” when you have finished.

You can manage inventory for variable products at the product level, variation level, or a mixture of the two.
Product Level Inventory Management:
Product level inventory management sets a stock quantity that all variations can share. Setting the stock quantity at the product level allows you to track the number of products you have left in total for all variations.
Variation Level Inventory Management
Variation-level inventory management sets a stock quantity per variation in a variable product. One example of utilizing variation-level inventory management is when you have three distinct colors of a t-shirt and need to track the quantity of each color remaining.
Blue t-shirt – quantity 5
Green t-shirt – quantity 10
Red t-shirt -quantity 15
When a customer purchases a red t-shirt, the stock decreases only for the red t-shirt and not for the blue or green t-shirts.
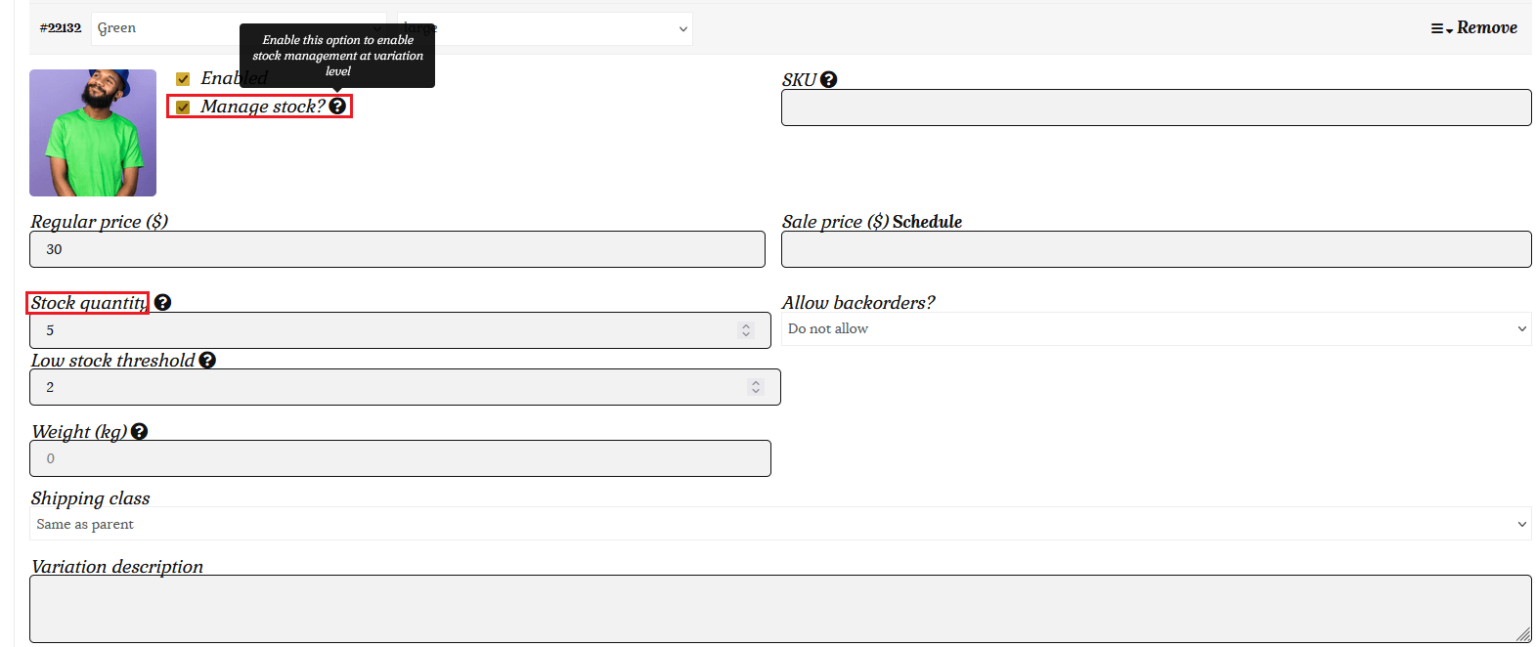
Follow these instructions to set stock at the variation level: Click on a variation to open its product edit menu.
Check the box next to “Manage Stock?” and then enter product information in the applicable fields:
SKU – Enter the SKU or leave blank. Note: If you set an SKU at the product level but leave it blank in the variation level, SKU will default to product level SKU.
Stock Quantity – Enter the inventory/stock quantity here
Low stock threshold – set the low stock threshold to receive a low stock alert via email when stock quantity reaches that number.
Click the “Save Variations” button at the bottom of the menu to save updates.
Once you have finished click the “Save Product” button to publish or update the product for your customers.
Combining Inventory Management Systems: Variation Level + Product Level Management
Any variations configured to manage their inventory at the variation level will pull stock from the variation level. Variations not configured to manage their stock at the variation level will pull from the product-level inventory if enabled.
In this way, you can decide for each variation whether it should have its own inventory count, or pull from the shared inventory at the product level.
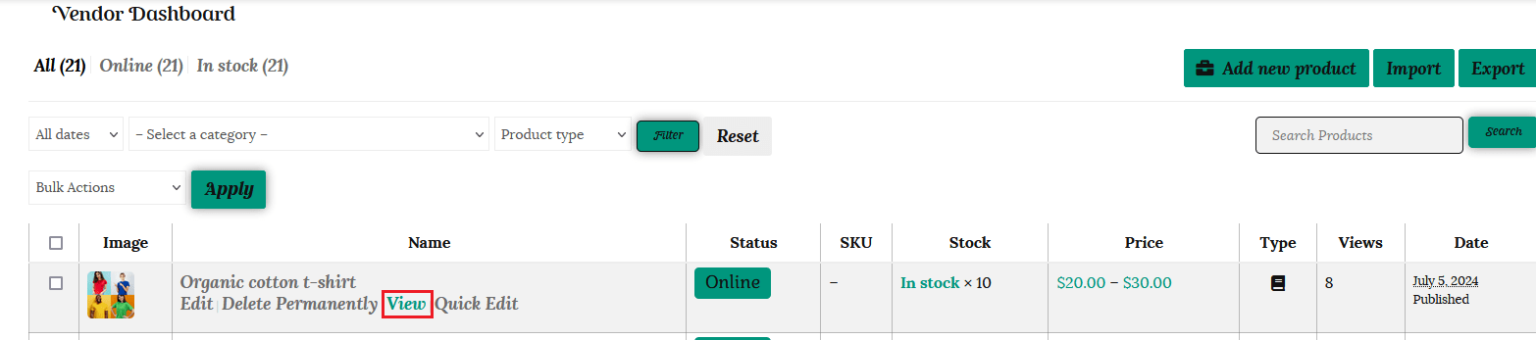
To edit any product you have listed, click on the “Edit” button. This will open up the Edit product page and allow you to edit any field.

Using the “Quick Edit” link opens up a popup form allowing you to quickly edit the product’s title, category, SKU, weight, shipping class and stock quantity.


To review your changes from the customer’s perspective, click on the “View” link.
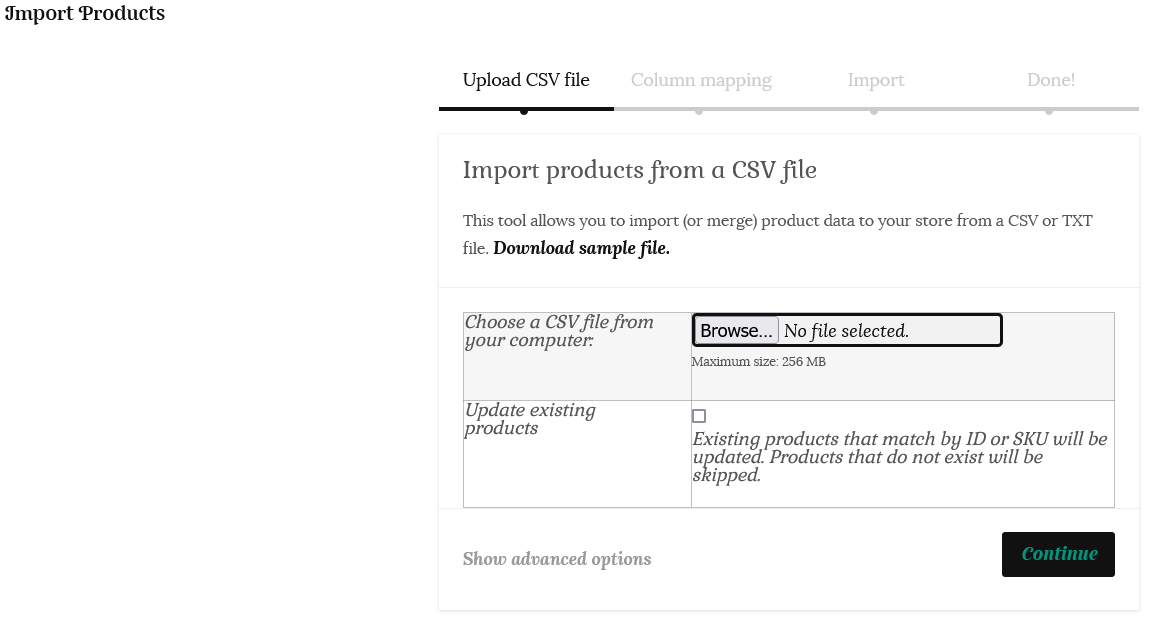
You are able to import your products in bulk using a CSV file. Go to your Vendor Dashboard and select the Products tab. Click the “Import” button on the right and select the relevant file from your device.

To edit your products in bulk, go to your Vendor Dashboard and select the Products tab. Click on the “Bulk Actions” dropdown and select “Edit.”

Select the products you would like to edit by checking the tick-box next to the product, or clicking the top checkbox to select all products on the page. Click the “Apply” button. Fill in the popup form with any changes you would like to make, and then click the “Update” button.

Bulk edit products in a spreadsheet
Another way to bulk update your products is to export them, edit the data in a spreadsheet (using Google Sheets or Excel), and import the items into your site again.
When you choose the export option, the plugin will create a downloadable CSV file that contains a list of products with their corresponding details, including product title, price, stock, status, and more.
Once you download the file, you can make bulk edits in the spreadsheet, then return to this page to import the updated products.
All you need to do is click on the Import button and choose your CSV file.
Please note; the bulk editor is only visible on screen sizes above 767px due to its table-style layout. For screen sizes smaller than this your products will need to be edited individually.
Product add-ons allows you to add paid or free options to your products using several field types including radio buttons, check-boxes, drop-down fields, custom text inputs and more.
You may offer gift-wrapping for an extra fee, or different options for customising a product.
The addon options can be applied to all products in your store or an individual product only.
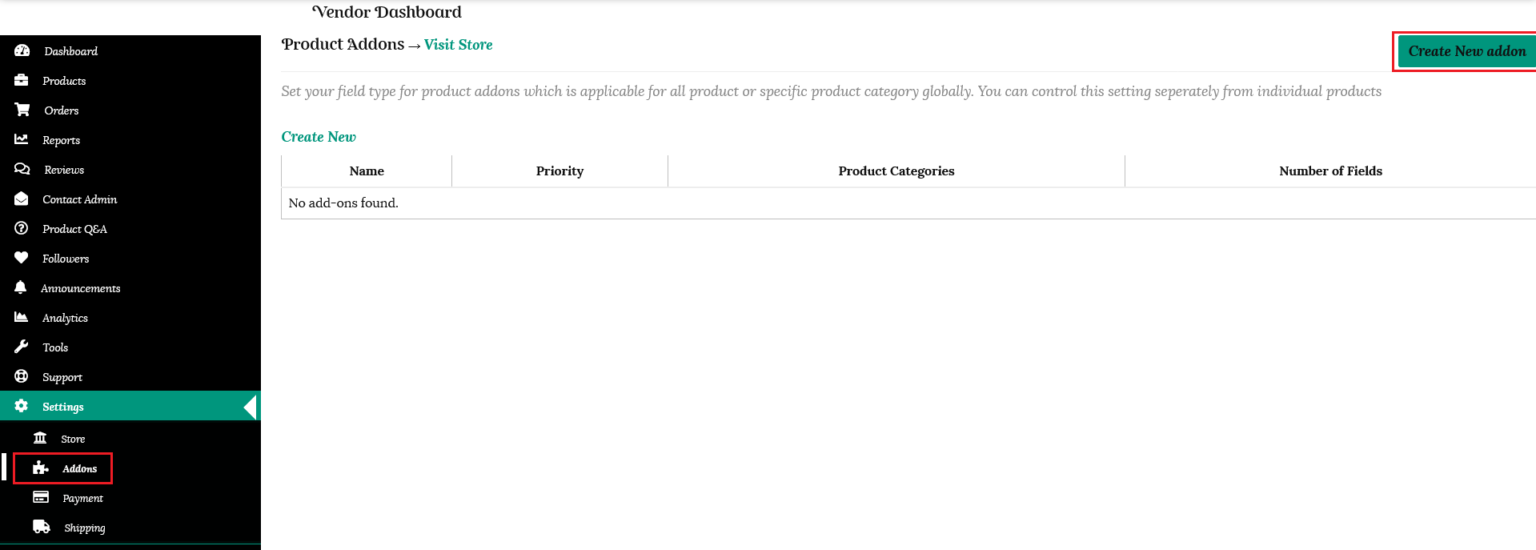
To set up add-ons for all products in your store, go to your vendor dashboard, select “Settings” and then the “Add-ons ” tab. Click “Create new add-on” and the product add-on form will open.
Now you need to add;
Name: Add a name for your add-ons to differentiate them from other add-ons. It will not be visible on the website. By default, this is filled in for you.
Priority: If there are multiple add-ons, this number will define in what order will be displayed. But for individual add-ons this number will be 10.
Product Categories: Add the product category you want this add-on to be applicable to. This will help you in the seasonal and time-specific add-ons.
Once you have filled this in, click on the “Add Field” button.

Some further options will be shown;
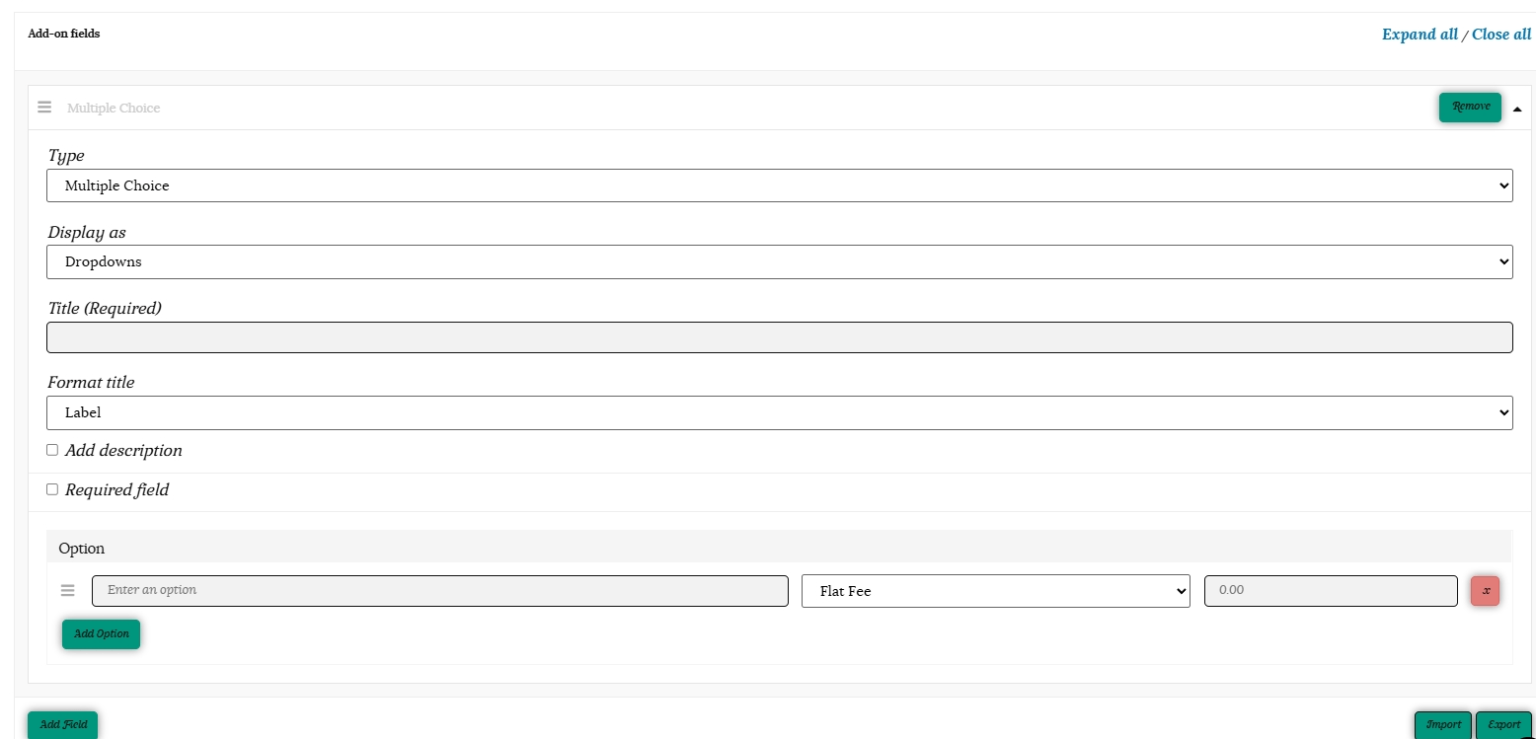
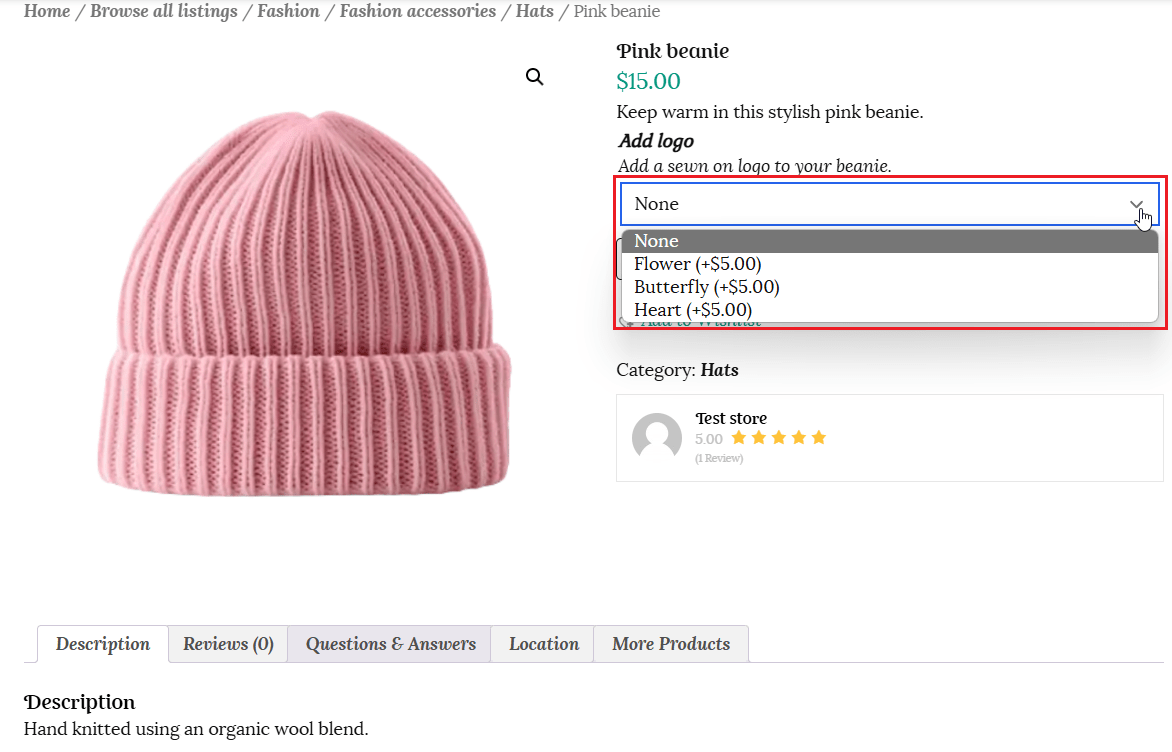
Type – has a dropdown list of options
This shows a list of options the customer can choose from as dropdowns, images, or radio buttons.

Display as – Selecting multiple choice will open the “Display as” options menu.


Title – this is required and will be displayed above the individual options for each addon.
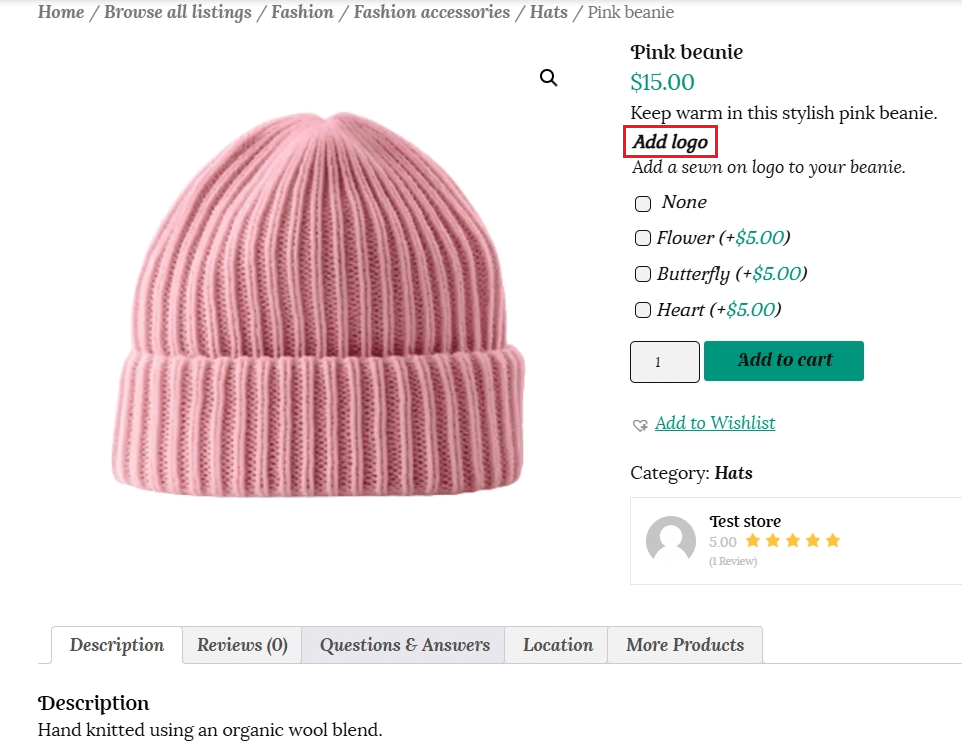
Format title – the title can be formatted as a label, the larger font of a heading or hide it and just use the description to instruct the customer.
Add description – Enable this option to add additional information about the addon. This displays more information about the addon underneath the title, or can be the sole source of information if you choose to hide the title.
Required field – Check this option to prevent the product from being added to the cart if an option is not selected.
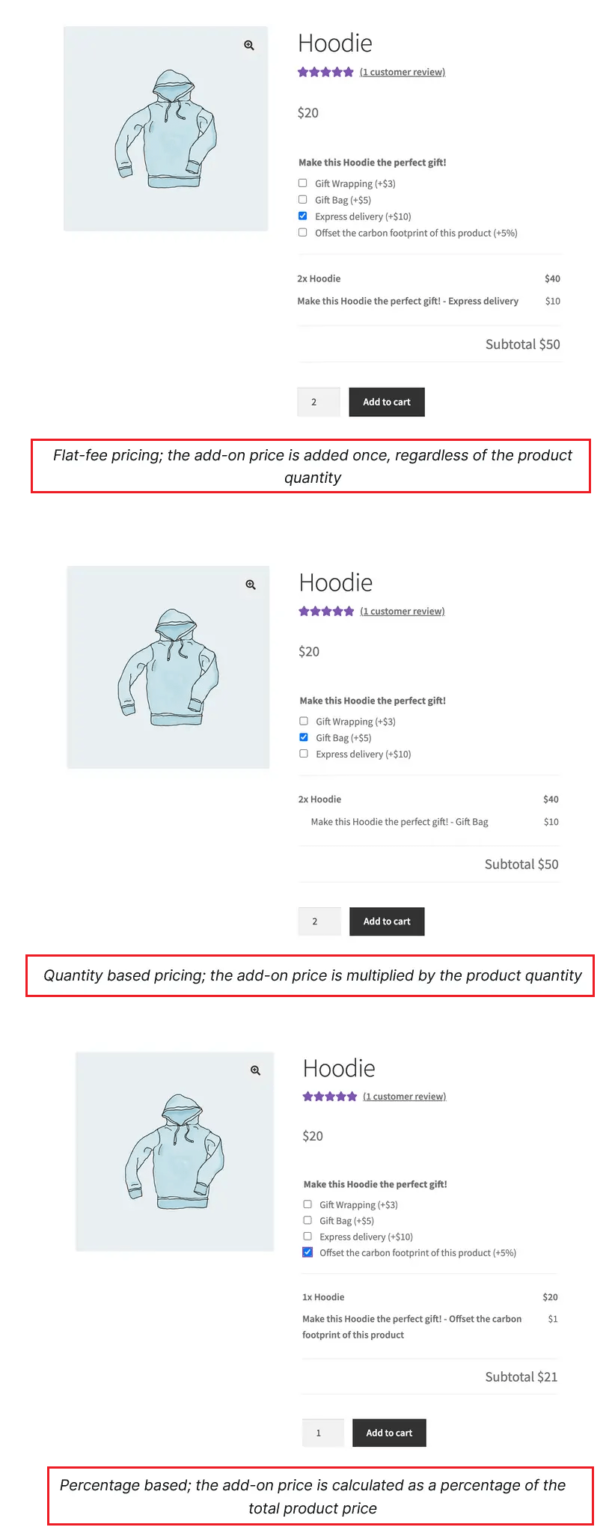
Add-on Pricing options
Add-ons can either be free or paid. The selection of a paid add-on increases the total product price.
Paid add-ons can be:

You must add a Label for each option, so the information shows when viewing the order and is passed through in the confirmation email to the customer.

Lastly, click on Publish to finish creating your Add-ons.
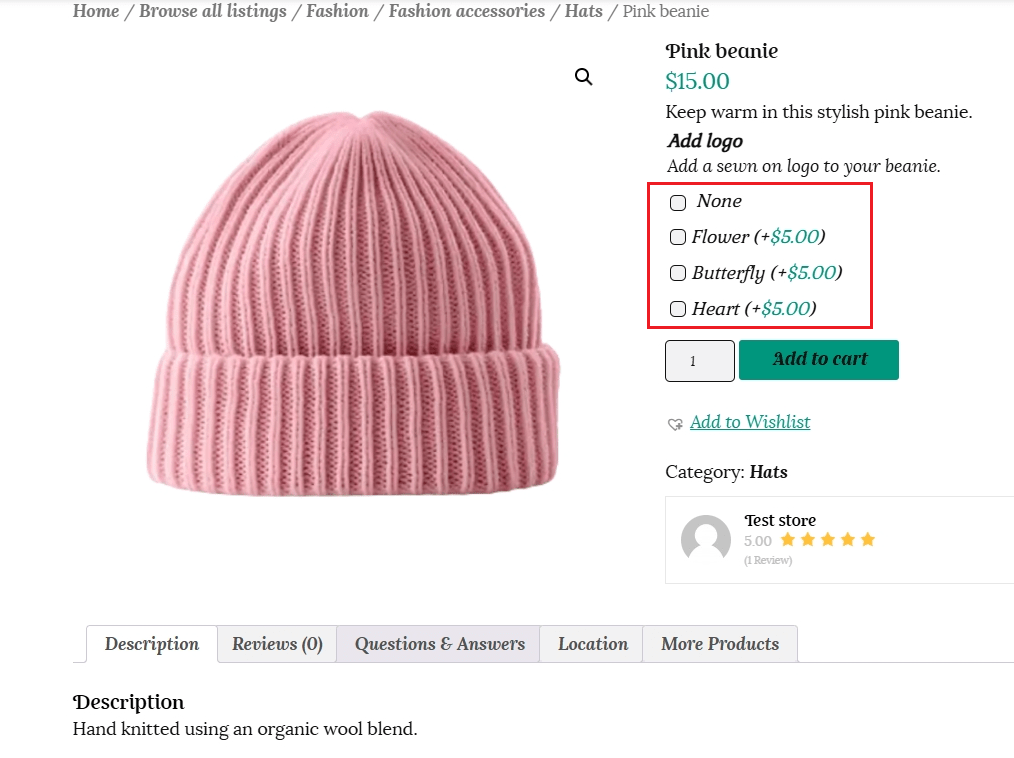
The Checkboxes addon displays a list of additional options as checkboxes. This addon type is great for offering additional services, such as gift wrapping. Customers can select multiple checkboxes.
To remove an option row, click the button ‘x’

Lastly, click on Publish to finish creating your Add-ons.
Note: You must add a Label for each option, so the information shows when viewing the order and is passed through in the confirmation email to the customer.
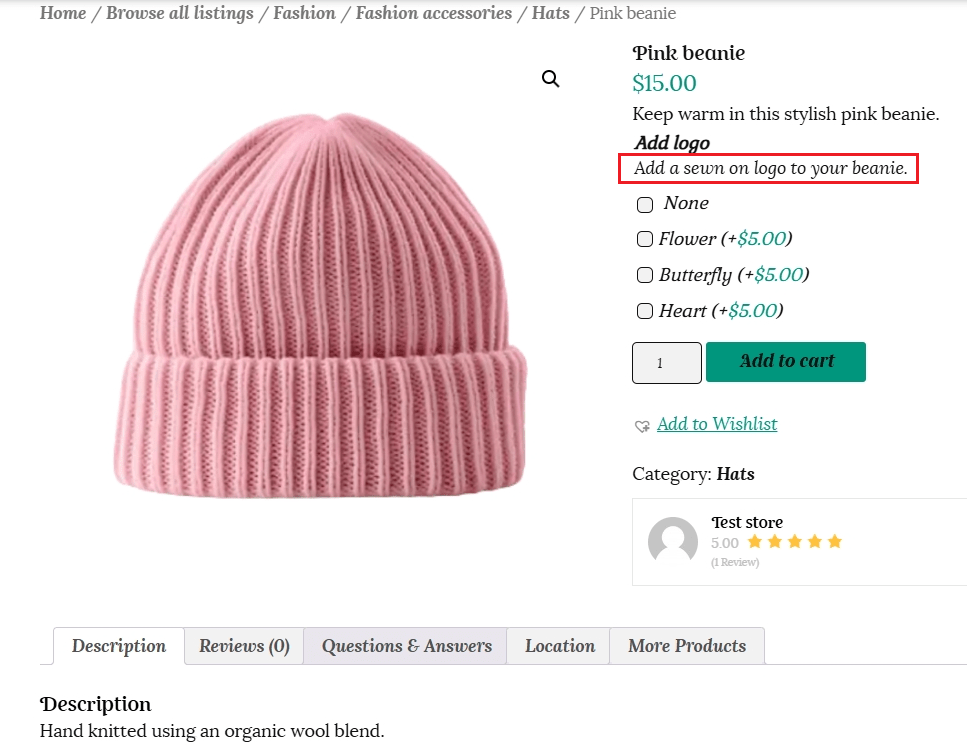
This is how the customer will view the addon above.
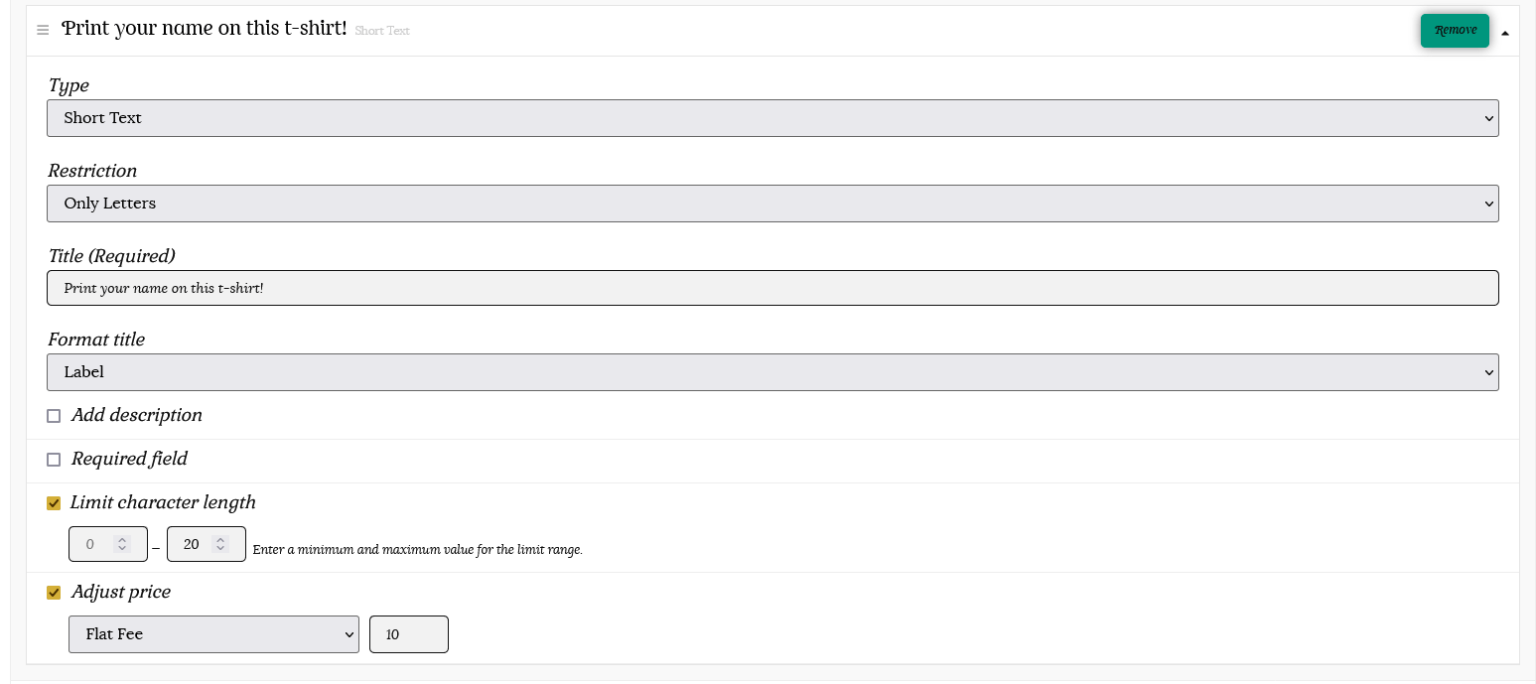
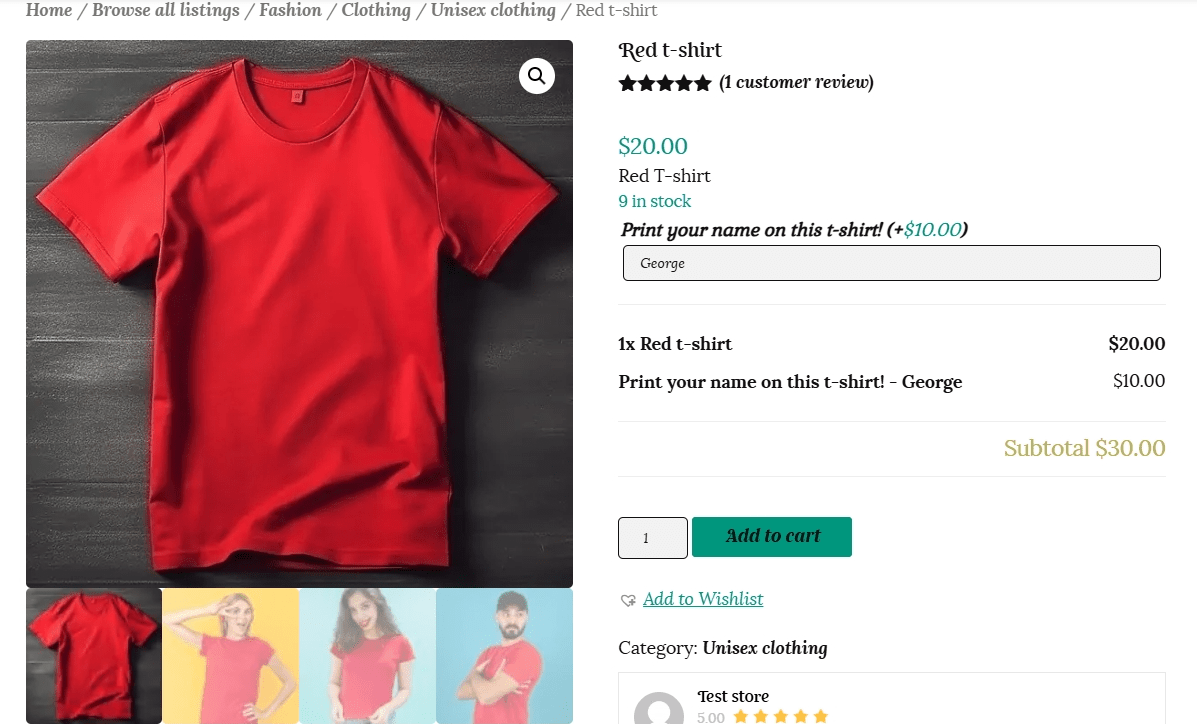
The Short text add-on displays a short text field for customers to fill in. This add-on type is great for filling in personal data, like a name to further customise a product, by adding an engraving or a printed text.
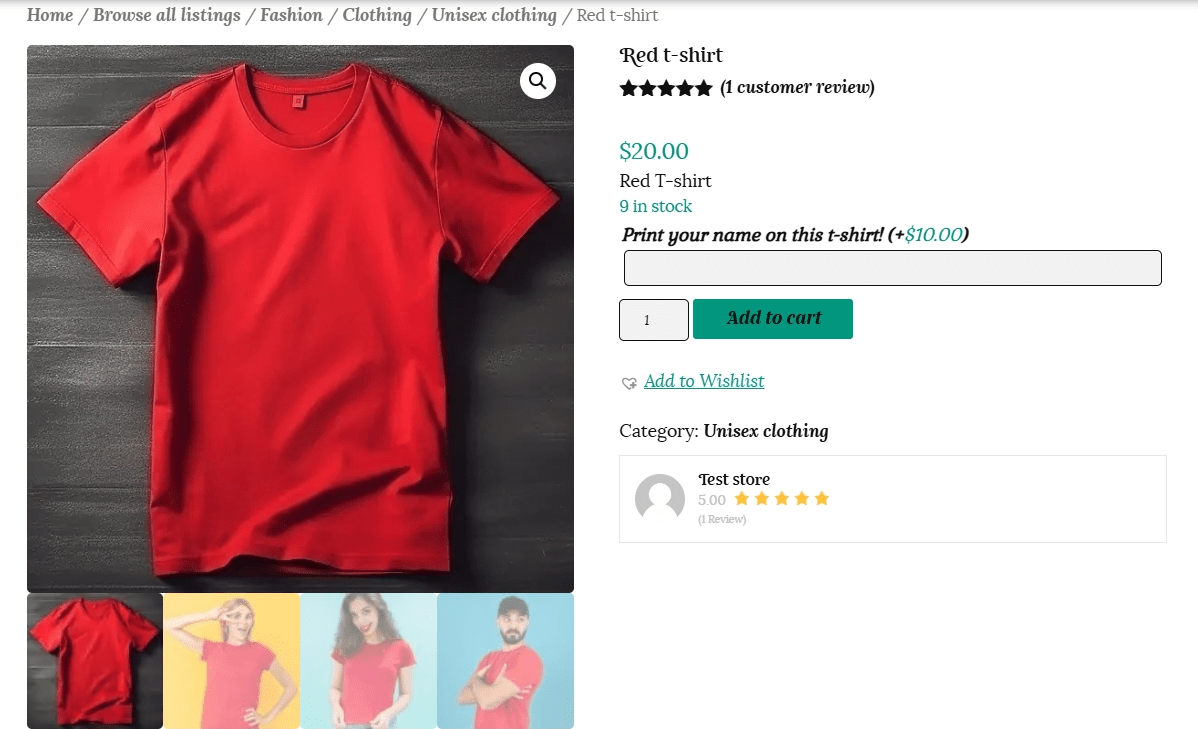
Once the customer adds their text, the additional fee will be added as seen below.
The Long text add-on displays a long text field for customers to fill in. This add-on type is great for allowing customers to type lengthier texts, like a gift note or special instructions/requests.
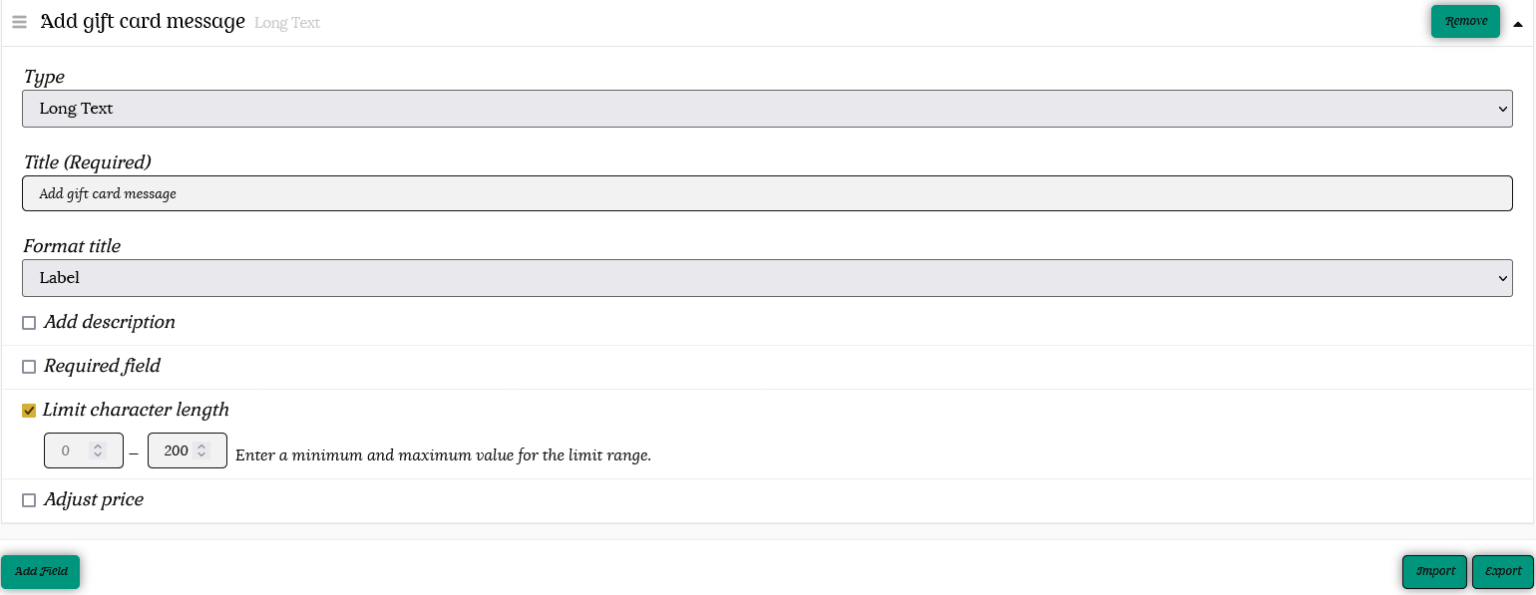
You can also limit the character length for this option.
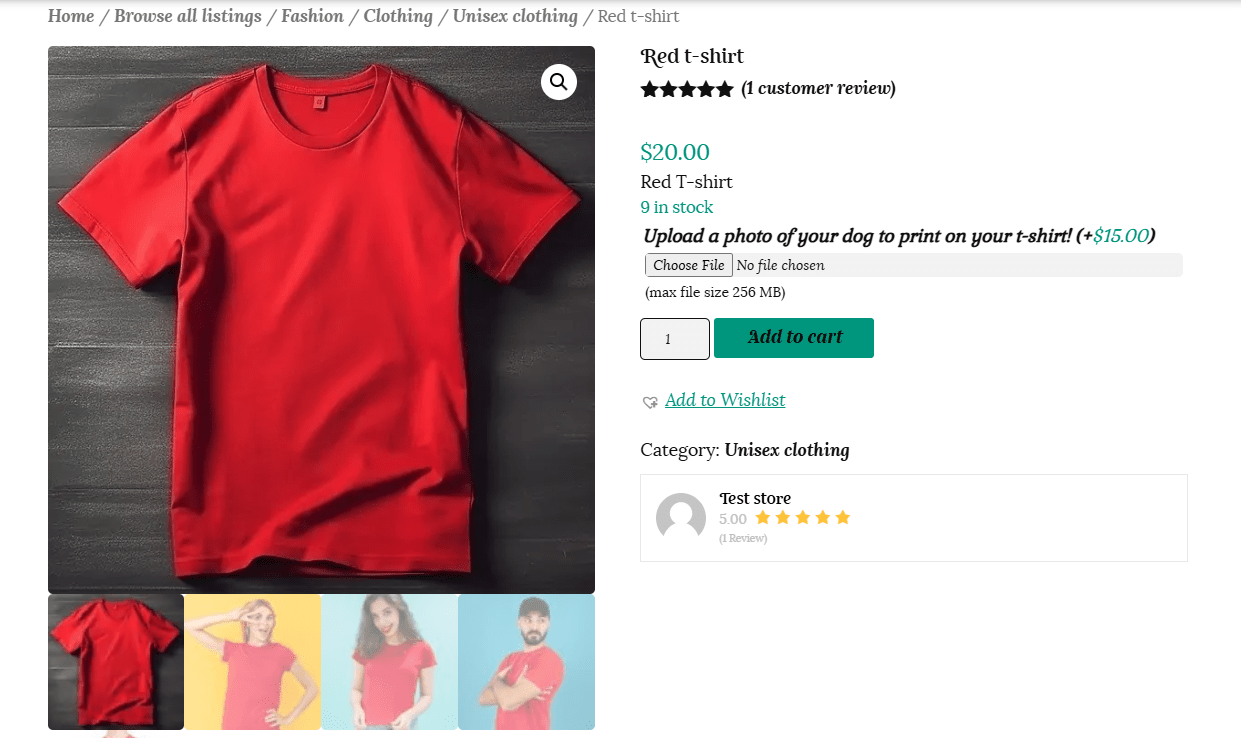
The File Upload add-on displays a button that customers can use to upload their own picture. This add-on type is great for creating custom product designs on t-shirts, mugs, or business cards.
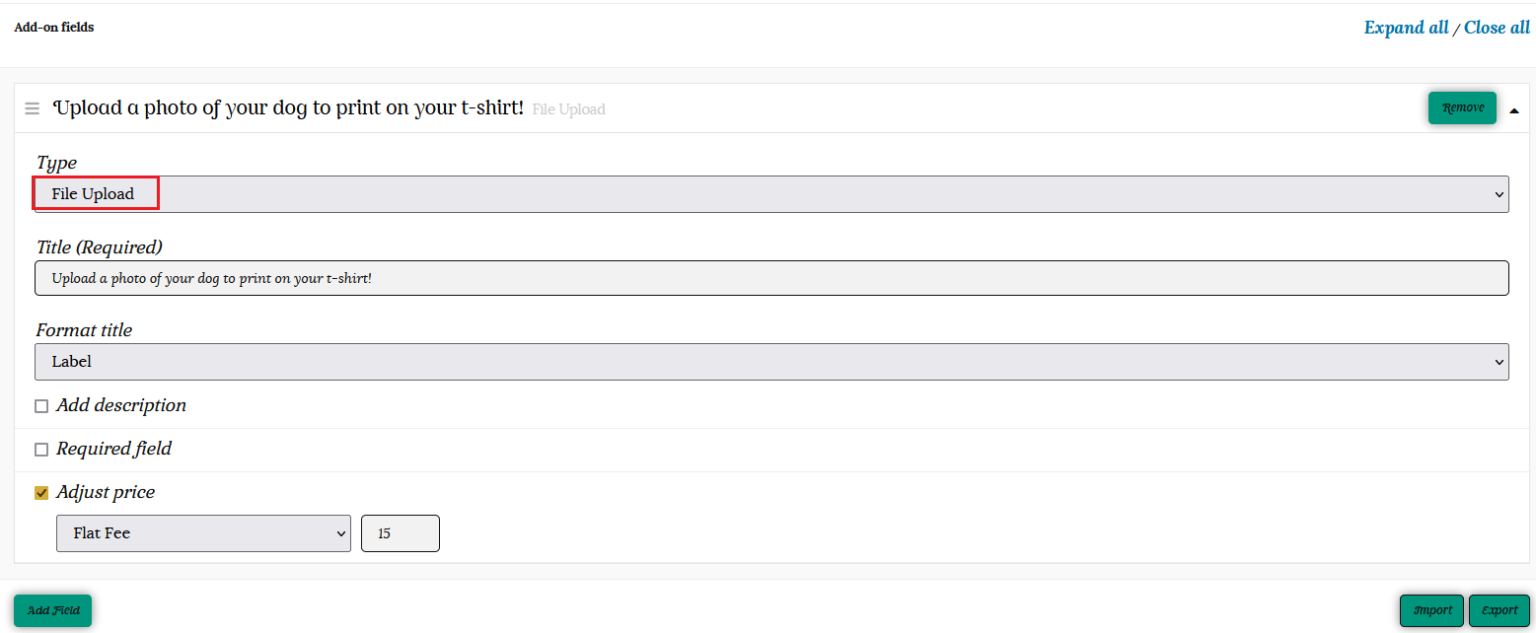
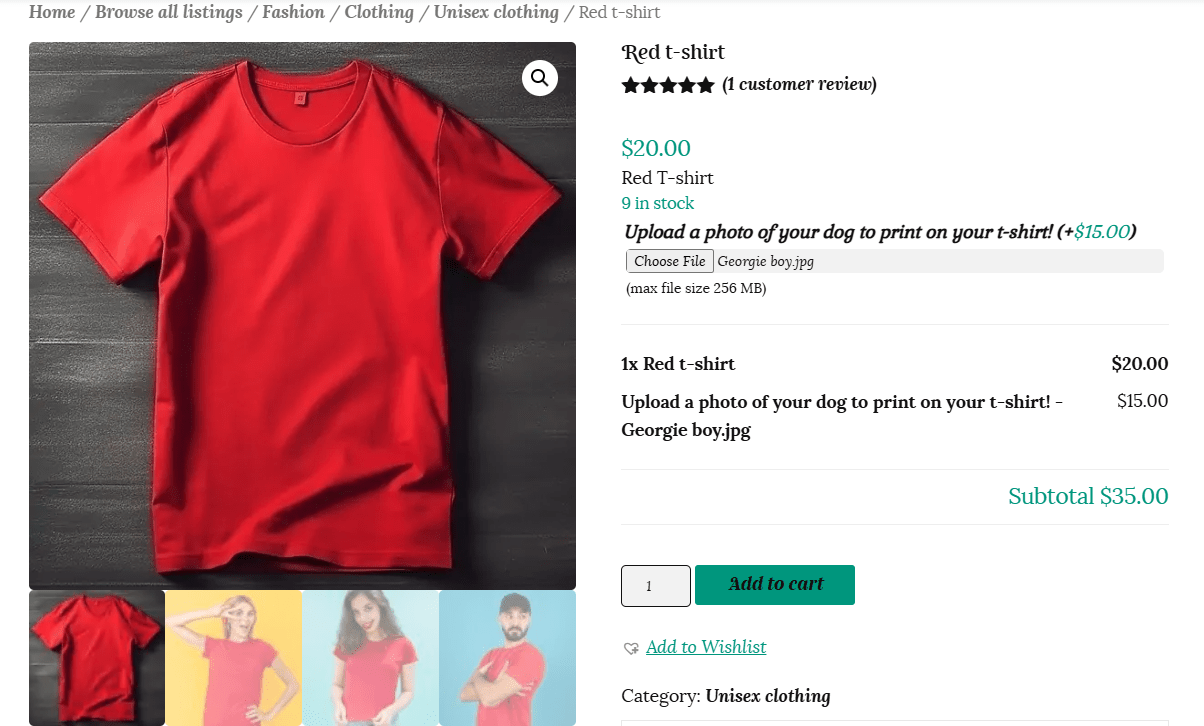
The uploaded file will show up in the order confirmation emails to both the vendor and customer.
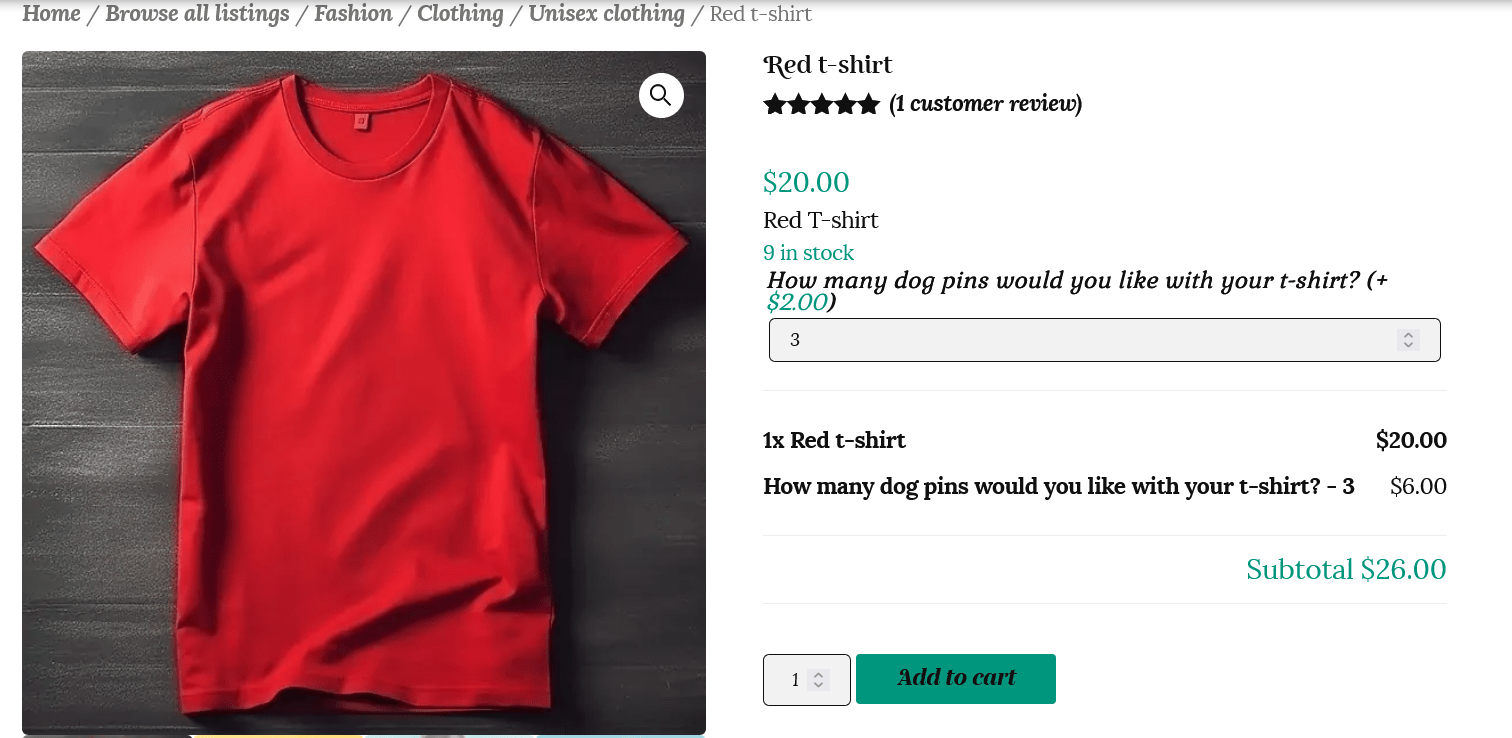
The Quantity add-on displays a field where customers can fill in a custom quantity.
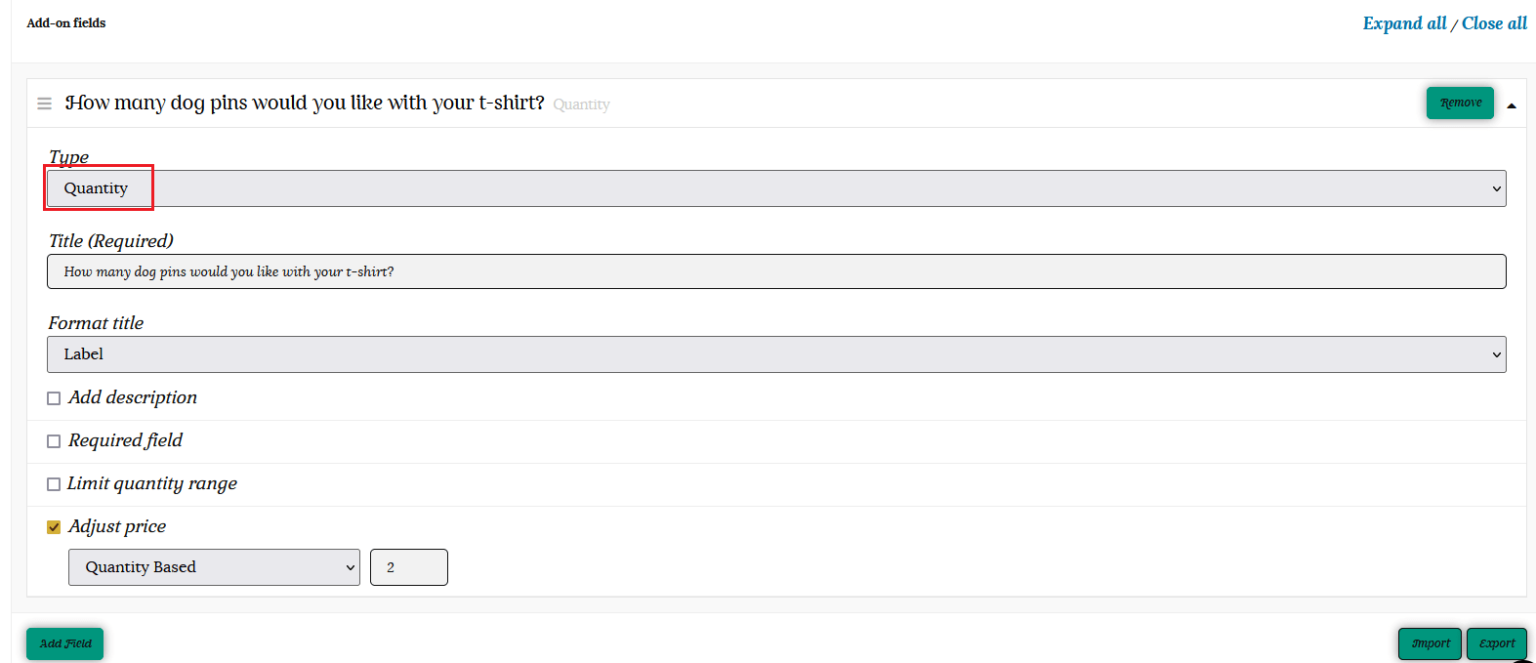
You also have the option of limiting the quantity of items the customer can purchase with the product.
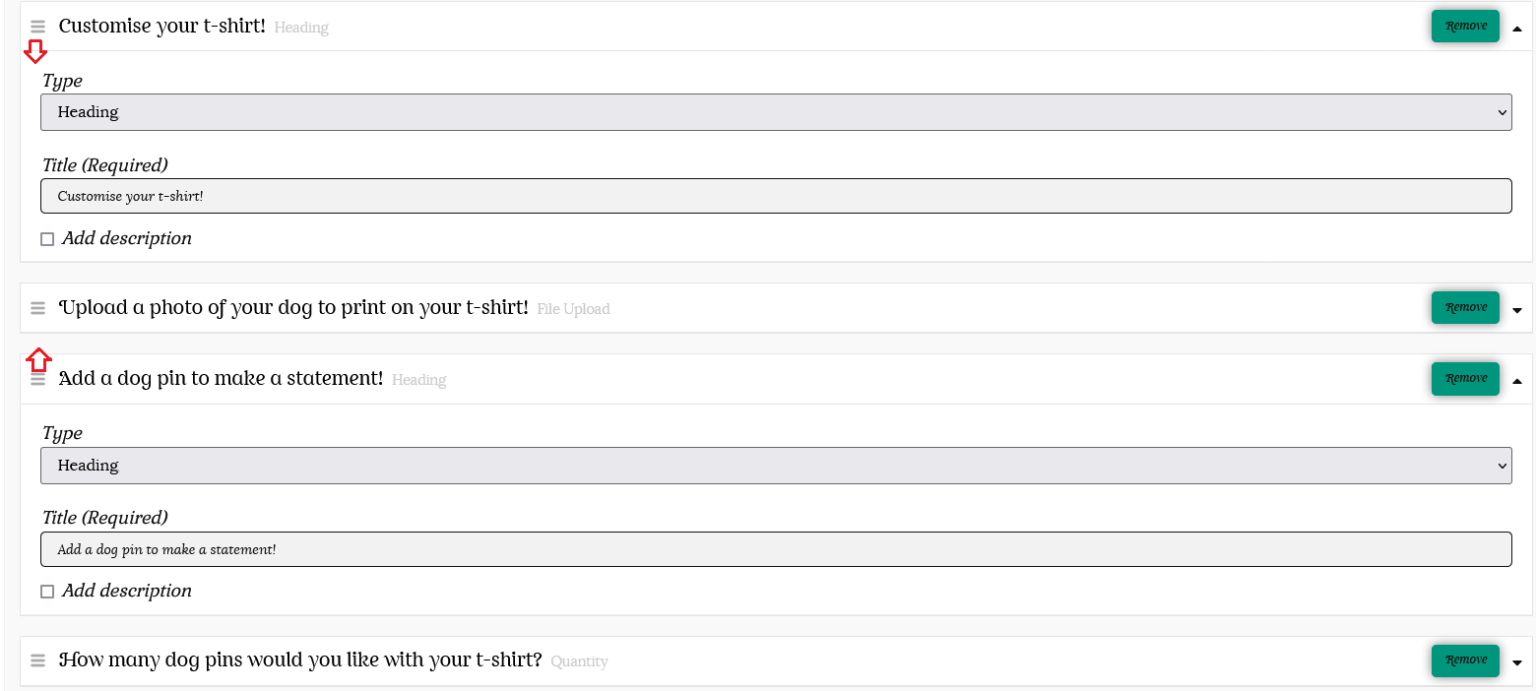
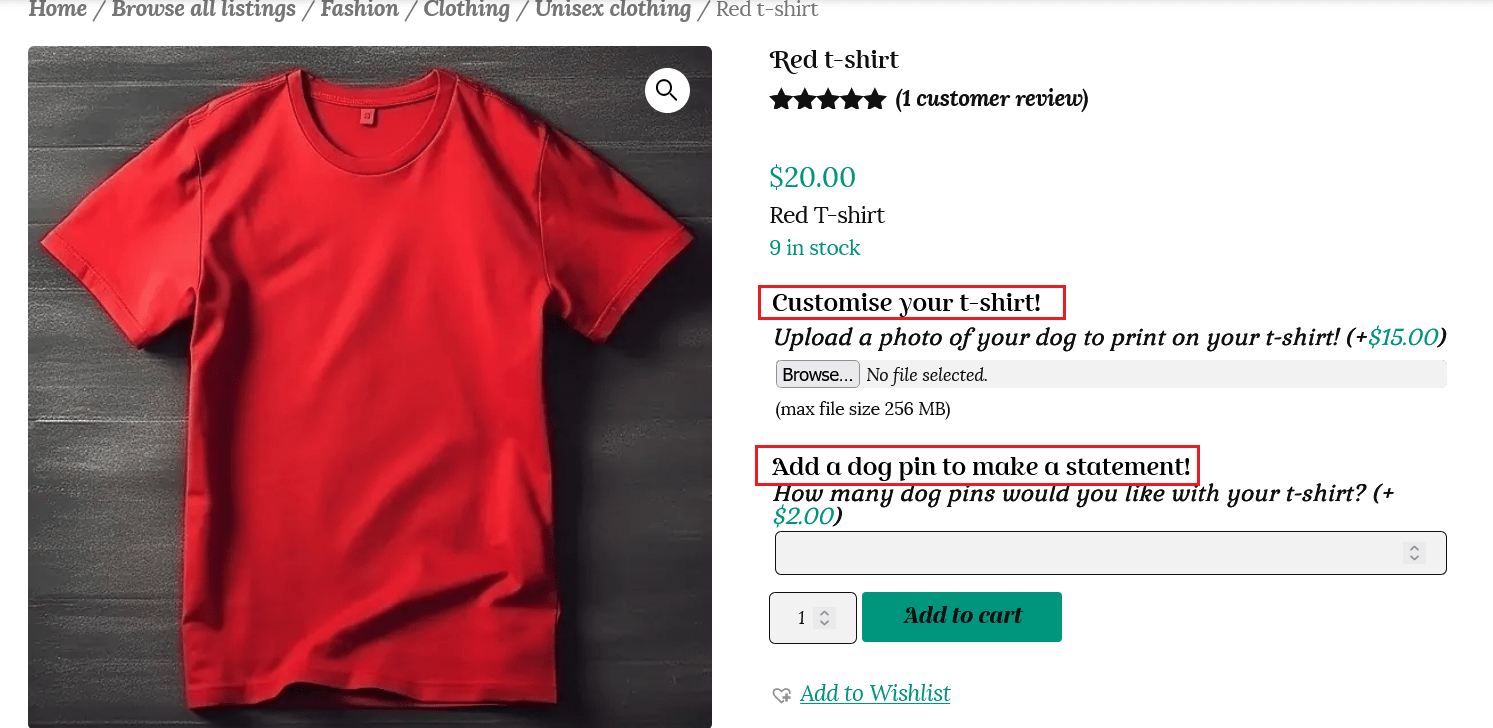
The Heading add-on adds a heading to the product page and it is great for separating add-ons into sections if you have multiple add-ons. You can add a heading/headings and drag and drop into any position.
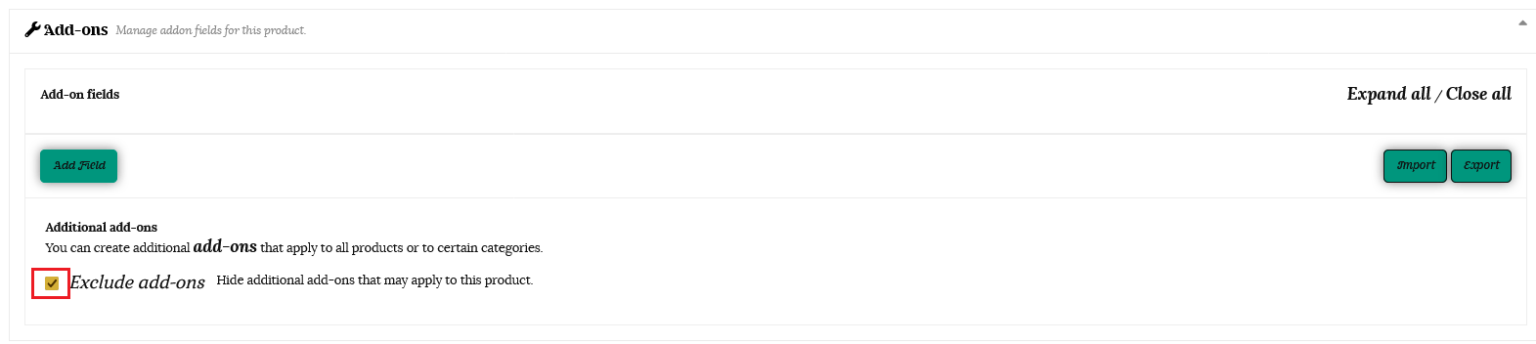
So far, the add-ons we have created were global add-ons. That means that add-on was applicable to all the products in your store.
To prevent any individual product from inheriting global add-ons, tick the checkbox to “Exclude add-ons.”
There is an option for creating add-ons for an individual product as well.
To do that, just go to the Edit page of the product. Then scroll down to the Add-ons section. Click on the “Add Field” button.
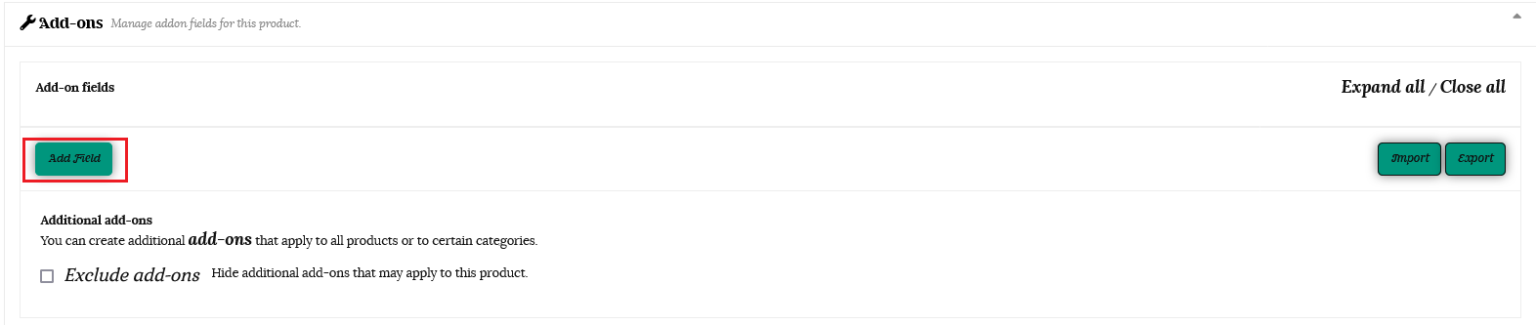
Once clicked, you will get the same add-on fields as detailed above.
Edit those options to make an individual add-on for that particular product only.

Add-ons that are added to Variable Products are inherited by all variations. It is not possible to define different add-ons per variation.
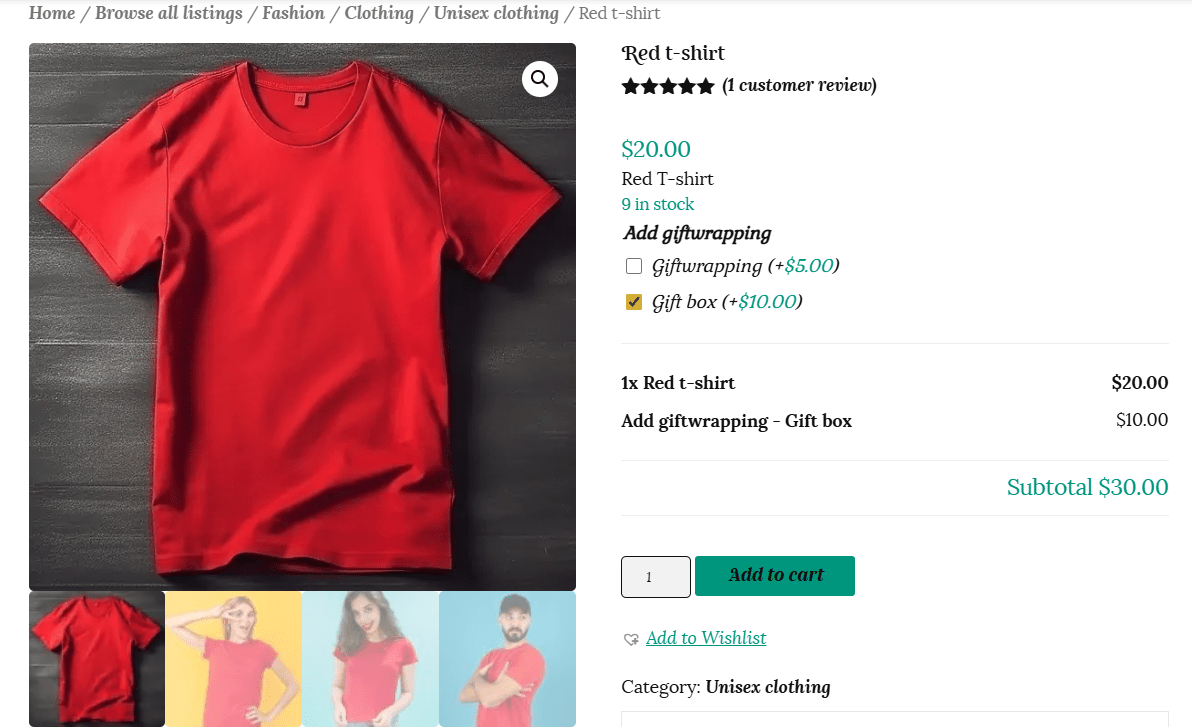
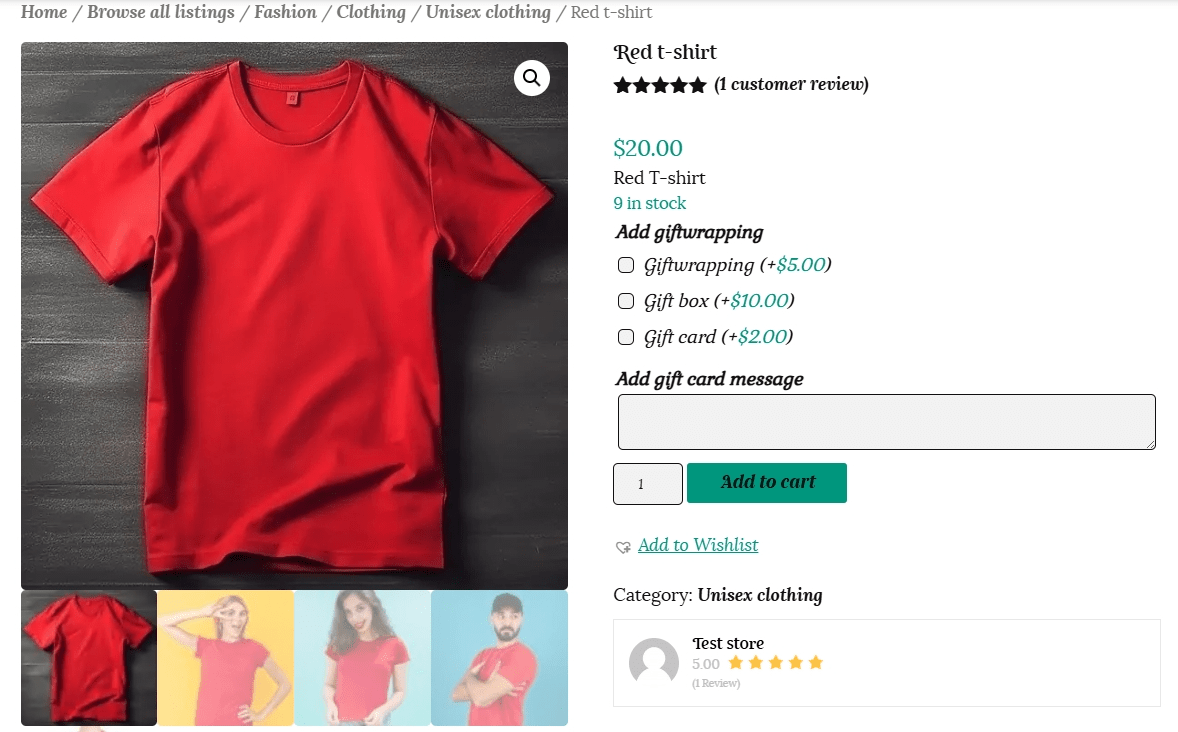
You are able to add a global option such as giftwrapping to all products in your store, as well as further options at the individual product level. See the example below to show how this will be viewed by the customer.

Please reach out if you need further assistance in listing your products. You are welcome to contact us here or use the “Contact Admin” tab in your vendor dashboard. We are happy to help.